
Home Assistant allows you to integrate your Z-Wave controller with the rest of your home devices. Sometimes though, it can be a bit annoying to wait for your Z-Wave network to come back online after you’ve reboot Home Assistant. ZWave2MQTT is a new Z-Wave to MQTT gateway that allows you to control your Z-Wave network using MQTT topics.
This tutorial walks you through installing and basic set up of ZWave2MQTT. After setting up the service I discuss how to add your Z-Wave devices to your Home Assistant installation using the various MQTT integrations. You need to have an MQTT broker running and integrated with Home Assistant as a prerequisite for this tutorial.
ZWave2MQTT for Home Assistant
Like I mentioned in the introduction, my main motivation for installing ZWave2MQTT is separating my Z-Wave devices from Home Assistant. This will allow me to reboot Home Assistant without having to reboot my Z-Wave network and vice-versa. If you haven’t noticed, every time you reboot Home Assistant it restarts the Z-Wave network resulting in lots of messages on the network to query all the devices. With this approach, Home Assistant just boots up and connects to the MQTT broker for device control.
The diagram below shows how the system will operate.
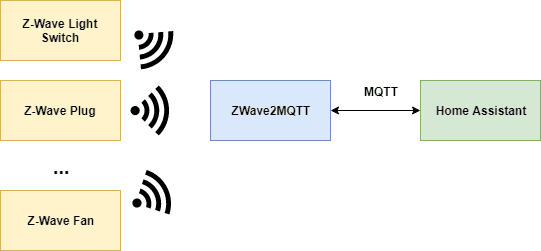
Another motivation you might have is you want to put your Z-Wave controller in a central part of your house, but don’t want to run Home Assistant off of that same machine. By using ZWave2MQTT you can expose your Z-Wave network over MQTT so anything on your network can control it. Including a Home Assistant instance running in your basement or somewhere else.
Finally, you could also use this to enable WiFi-based devices (like ESP8266 based devices) to interact with your Z-Wave network. Previously you would have to do this using some sort of automation through Home Assistant. Now your DIY WiFi devices projects can directly interact with Z-Wave devices through MQTT. I could see this being useful if you want to read a Z-Wave motion sensor to detect motion and then perform some action on your ESP8266.
Using ZWave2MQTT for Home Assistant is not exactly straightforward though, follow this guide to learn how to migrate your devices.
Installation and Setup
There are a few different ways to install ZWave2MQTT that you can find in their docs. I went with the standard Docker way and running the container using docker-compose. You can see my docker-compose.yml file below. Make sure you mount your USB Z-Wave controller into the container and expose port 8091. There is also a Hass.io Add-on for Home Assistant.
|
1 2 3 4 5 6 7 8 |
zwave2mqtt: image: robertslando/zwave2mqtt:latest devices: - "/dev/serial/by-id/usb-0658_0200-if00:/dev/zwave:rmw" volumes: - ./config/zwave2mqtt/store:/usr/src/app/store ports: - "8091:8091" |
After booting up your container you can navigate to localhost:8081 from your web browser to continue setup.
The ZWave2MQTT GitHub page has a full description of the setup options. The following sections detail my configuration.
Z-Wave
First off you need to configure your Z-Wave settings. Click the “gear” on the left side of the screen and open up the Z-Wave portion.

My Z-Wave configuration is pretty standard. First off you need to put the location of your Z-Wave serial port. When I mounted the Z-Wave stick into the docker container I mounted it to /dev/zwave, so that’s what I listed here. I set the poll interval to 1 second. If you’re using a Z-Wave network key you can also place it here.
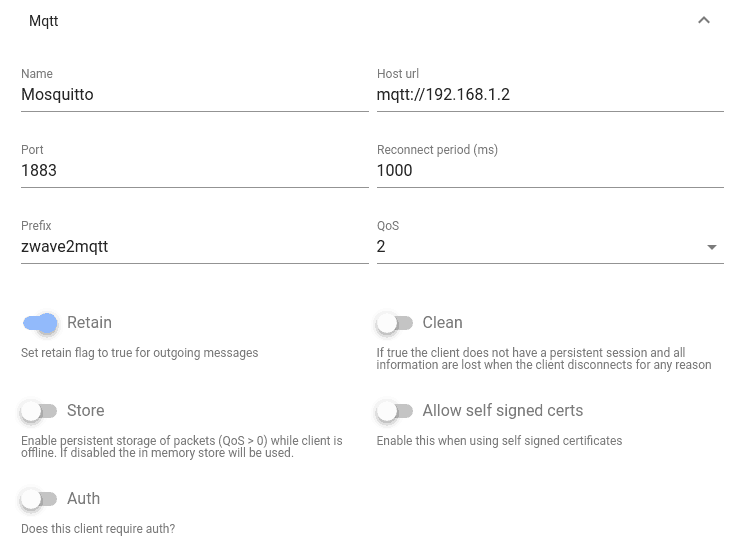
MQTT
Next is the MQTT portion. Here I listed the URL where my MQTT broker is running. Note that you need to put the mqtt:// for the URL to work. If you’re running on a non-standard port or doing authentication for MQTT you can set that here.
You’ll note below I set the prefix to zwave2mqtt. This is to tell ZWave2MQTT that every MQTT topic should start with that prefix. That makes it easy to differentiate your ZWave2MQTT topics compared to the rest of the topics running on your broker.
Also, it’s important to set the Retain value to True. This will allow Home Assistant to grab the latest values when it boots up rather than using an assumed state.
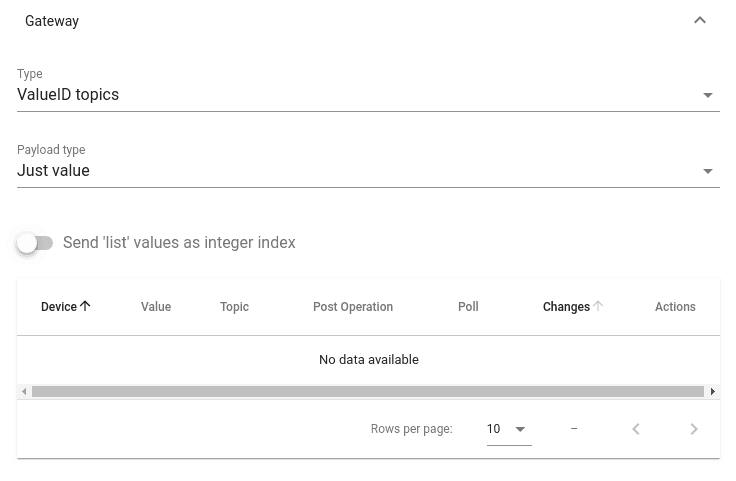
Gateway
Finally the gateway portion of the configuration. We want to use the ValueID type of topics. This autogenerates the MQTT topics for us based off the ValueIDs of the individual Z-Wave devices. We also need to set the payload type to Just value. This will make it easier to read and write data to ZWave2MQTT for Home Assistant.
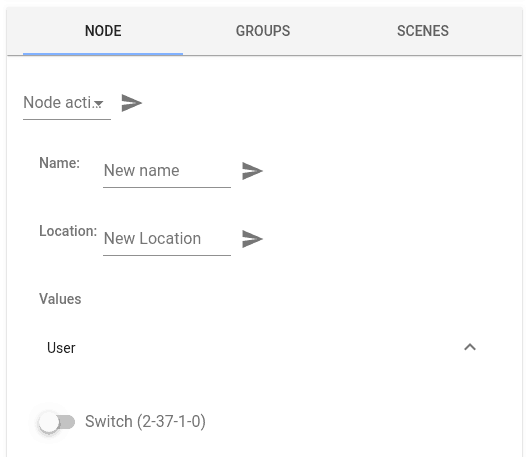
Once that’s all done make sure to click “Save” at the bottom of the screen. If it all worked, click the “Control Panel” button on the sidebar and watch your Z-Wave devices get populated. Once they are populated you should be able to control any device by selecting it from the list of devices and using the “User” menu under “Values” in the “Node” tab.
Configuring Home Assistant
Unfortunately, there is no “discovery” mechanism for ZWave2MQTT for Home Assistant. Every device or sensor in your Z-Wave network that you still want to control from Home Assistant must be added individually using Home Assistant MQTT integrations. I’ve laid out a few of my devices in my home that I moved over and the resulting MQTT integrations that could be reused.
Primer
To make this process easier I definitely recommend installing the mosquitto MQTT command line tools. This will allow you to subscribe on any topic from the command line and watch messages as they are published. I subscribed to everything under the zwave2mqtt topic to help with debugging.
|
1 |
mosquitto_sub -v -h 192.168.1.2 -p 1883 -t "zwave2mqtt/#" |
The topics we’ll be subscribing and publishing to follow a predictable structure.
|
1 |
mqtt_prefix/node_id/class_id/instance/index |
Chances are though that you don’t know the <class_id> , <instance> or <index> off the top of your head. It’s very easy to get this from the Z-Wave2MQTT GUI though. If you look in the screenshot below, I’ve highlighted a little text box with 4 numbers in it. That will give us the correct topic to access this device. The topic to set the value will be the same with /set added to the end.
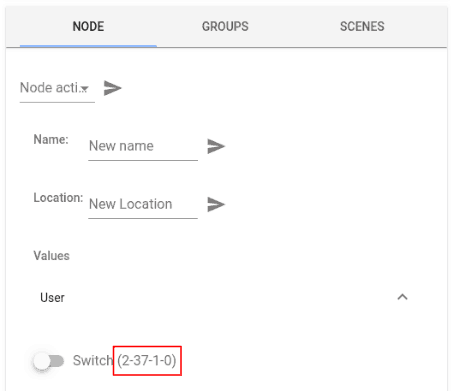
So to use this switch the current state will be available at zwave2mqtt/2/37/1/0 and we can set the state at zwave2mqtt/2/37/1/0/set.
Using that information with the mosquitto_sub command I mentioned you can subscribe to an individual device if you want to just see messages for that device as you debug it.
Switches
The first device we’ll add is a switch using the MQTT Switch integration. I’ve got GE Z-Wave switches at my house but I think this should work any time of switch. The switch integration is pretty straightforward, we just need to first get the state_topic for the switch from the ZWave2MQTT GUI. Choose the device from the ZWave2MQTT GUI and determine the topic that controls the switch (check out the primer section above to learn how to do this).
If you subscribe to the topic and activate the switch from the GUI you’ll see that the topic expects true and false as the payload values. Luckily, the MQTT switch integration in Home Assistant is customizable and allows us to change this from the default “ON/OFF”. Below you can see my YAML configuration for one of my switches.
|
1 2 3 4 5 6 7 |
switch: - platform: mqtt name: "Office Light Switch" state_topic: "zwave2mqtt/2/37/1/0" command_topic: "zwave2mqtt/2/37/1/0/set" payload_on: "true" payload_off: "false" |
This general structure should also work for Z-Wave plugs like the GE Z-Wave Outdoor plug or the Zooz ZEN25 that I’ve reviewed.
Dimmer
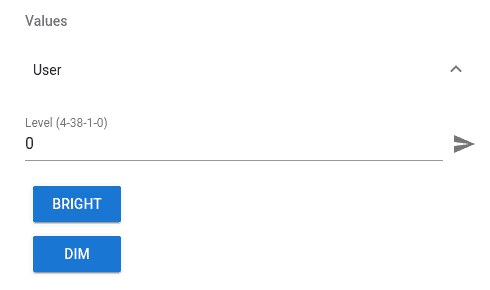
Dimmer switches are a little bit more complicated. I personally like the Zooz ZEN22 dimmer switch and use them in my home but the concept should apply to all dimmer switches. The way ZWave2MQTT models the dimmer switch there is just a single topic to set a value for controlling brightness. There is no separate command_topic that must be set first to turn on the switch before trying to set the brightness. Luckily the MQTT light integration allows us to just send the brightness value by using the on_command_type attribute.
To control the light in ZWave2MQTT we only care about a single value to set the brightness. There are some additional buttons to “Bright” and “Dim” the switch, but we won’t be using those over MQTT.
This translates into the following YAML configuration for Home Assistant. The most unique piece is the on_command_type attribute I already mentioned that tells Home Assistant to just send the brightness value to control the light. We still have to set the command_topic because it’s a required attribute, but it’s not really used in our case.
|
1 2 3 4 5 6 7 8 9 |
light: - platform: mqtt name: "Living Room Dimmer" command_topic: "zwave2mqtt/4/38/1/0/set" brightness_command_topic: "zwave2mqtt/4/38/1/0/set" brightness_scale: 99 brightness_state_topic: "zwave2mqtt/4/38/1/0" on_command_type: "brightness" payload_off: 0 |
Fan
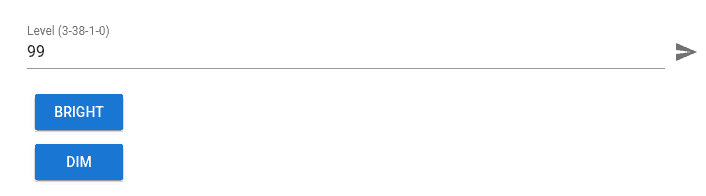
The fan was definitely the trickiest thing to convert over for me. I’m using a GE Z-Wave fan controller and if you haven’t already check out how I installed it. The fan is a 3-speed fan and is sort of similar in function to the dimmer. It has a Level value that translates to the fan speed that range goes from 0 to 99.
You can see in the screenshot below there are also “Bright” and “Dim” buttons. These roughly equate to “Speed Up” and “Slow Down” the fan speed. Also in the screenshot below you can see the value ID we can use to control the fan level. In my instance it’s 3-38-1-0.
We’ll use the MQTT fan integration to add the fan to Home Assistant.
|
1 2 3 4 5 6 7 8 9 10 11 12 13 14 15 16 17 18 19 20 21 22 23 24 |
fan: - platform: mqtt name: "Office Fan" command_topic: "zwave2mqtt/3/38/1/0/set" speed_command_topic: "zwave2mqtt/3/38/1/0/set" speed_state_topic: "zwave2mqtt/3/38/1/0" state_topic: "zwave2mqtt/3/38/1/0" speeds: ["off", "low", "medium", "high"] payload_low_speed: 24 payload_medium_speed: 50 payload_high_speed: 99 payload_off: 0 payload_on: 99 state_value_template: "{% if (value | int) == 0 %} 0 {% else %} 99 {% endif %}" speed_value_template: >- {% if (value | int) == 25 %} 24 {% elif (value | int) == 51 %} 50 {% elif (value | int) == 99 %} 99 {% else %} 0 {% endif %} |
Breaking down the configuration:
- Command and speed are both set to the same topics. This is because there really isn’t a separate topic to tell the fan “on” or “off”, you just tell it the speed to go.
- My fan controller supports 3 speeds, by pressing the paddle on the physical switch and watching the MQTT topic I discovered these were at 24, 50 and 99. Therefore I made these the payload values for the different speeds.
- Because there is no “state” topic, we make the payload for on and off to resemble the fan on and off. The state value template resembles this. No matter what speed the fan is going we want the state to be “on” within Home Assistant so the template needs to return the same value that
payload_onhas. - I noticed that the device always reports back one value higher than what I set it for the low and medium fan speeds. Using the
speed_value_templateI check for these cases and set them back to the payload values. The returned values fromspeed_value_templatemust match the payload values so that Home Assistant knows the speed the fan is running.
If you’ve got any questions about this please let me know in the comments!
Sensor
The easiest thing to move over is a sensor. You might have a motion sensor like the ZSE29 that I’ve reviewed. For this tutorial, I’ll be using the power measuring capabilities of the Zooz ZEN25 (which I also reviewed).
We start out the same way, go and find the node in ZWave2MQTT and make note of the Node ID and the series of numbers associated with the value you want to monitor. In the screenshot below you can see the power value has (14-50-1-8) next to it.

Now in Home Assistant, we’ll make a new MQTT sensor using this topic. I’ll also set unit_of_measurement and device_class to match my sensor. You can read more about those on the MQTT sensor page.
|
1 2 3 4 5 6 |
sensor: - platform: mqtt name: "Plug Power" state_topic: "zwave2mqtt/14/50/1/8" device_class: "power" unit_of_measurement: "W" |
Restart Home Assistant and that should be it for sensors!
Summary
I hope you found this tutorial on how to install and setup ZWave2MQTT for Home Assistant useful. There are a lot of other features in ZWave2MQTT so I highly recommend reading their documentation and looking through menus to see what is possible. If you enjoyed this content you might find some of my other Z-Wave related articles useful:
- Home Assistant Z-Wave Tips and Tricks
- Zooz ZSE29 Z-Wave Outdoor Motion Sensor Review
- Remote USB Z-Wave Controller over TCP
Please consider supporting the blog by joining my mailing list, following the blog on social media or directly through Buy Me a Coffee. Thanks for reading!