
If you’re just getting into smart home tech, lighting is a great place to get your feet wet. If you’re looking to start investing in Z-Wave for your lighting setup, the Zooz ZEN22 Z-Wave Dimmer Switch could be your answer. I replaced a switch in my garage to the ZEN22 to automate my outdoor lighting at night. In today’s review, I look at the features of the switch, installation process, and integration with Home Assistant. The ZEN22 switch is available at Amazon and The Smartest House.
For my review, I’m using the following:
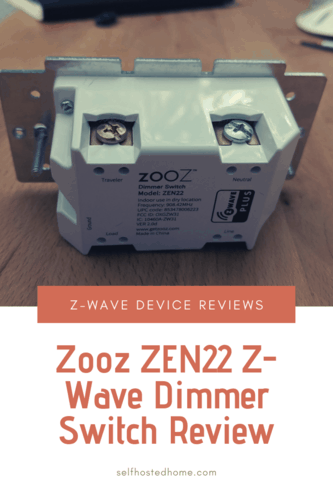
- Zooz ZEN22 Z-Wave Dimmer Switch
- 100W LED Light Build 3000K Dimmable
- Aeotec Z-Stick Gen5 Z-Wave Gateway
Zooz sent me this product for free to review on my blog. All thoughts and opinions are my own. I only recommend products that I enjoy using and would be comfortable using in my personal smart home.
Features
Physical Design
The physical design of the switch is very solid. The screw terminals worked well during my installation and the switch seems very high quality.

If you have any GE Z-Wave Dimmers, I would say the Zooz switch has a bit more of a “clicky” sound when pressing the paddle. But just looking at the switch, it would be hard to tell this part from the GE version.
The switch also has a small LED on the bottom that turns blue whenever the switch is off. Making it easier to find in a dark room. This can be turned off though or invert the behavior if you choose though through Z-Wave configuration options.

Zooz also built in some nice “smart tap” controls to the switch. Clicking the top paddle once will set the switch to last used brightness level and double tapping the top will set it to full brightness. You can also hold the top and bottom paddles to adjust the brightness.
Overall though, the physical design of the switch is very standard when it comes to paddle smart switches. That’s a good thing though, it blends in with the rest of your home and doesn’t look out of place.
3-Way Implementation
A main selling point of this Zooz model is the ability to use the dimmer in a 3-Way setup without buying an extra add-on “smart” switch. This can really save you money if you have a lot of 3-Way or 4-Way circuits in your house.
Zooz has a dedicated support page showing wiring diagrams for different setups. You will probably need to re-wire the other switches in the circuit, but you will save some money in the process. For my installation, I didn’t need a 3-Way circuit so I didn’t actually test this out, but I might give it a shot in the future.
Here’s a sample diagram they provide:

Wireless
The Zooz ZEN22 is a Z-Wave Plus device giving it increased range and is still backward compatible with Z-Wave devices. Because the device is always powered it acts as a repeater, strengthing your Z-Wave mesh network. The manual states that the range is up to 100 feet line of sight between the wireless controller and closest Z-Wave receiver module. For my tests today, it is not too far away from the closest Z-Wave device, but it is 2 hops from my main controller. The device works with a ton of different hubs including SmartThings, Vera, Wink, and OpenZWave (which Home Assistant uses).
The Zooz ZEN22 also supports “Instant Status” meaning that it updates your Z-Wave controller whenever the state of the switch gets updated. I’ll talk more about this in the performance section, but this worked well for me, even better than my comparable GE Z-Wave dimmer.
Configuration
The ZEN22 comes with a few different configurable options and these may be slightly different depending on the firmware that comes on your device. I’ve already mentioned disabling the LED. You can also invert the entire switch. The V2.0 version of the switch allows you to also configure the speed that the light changes brightness. It allows you to choose between two modes “fast” and slow”. Personally, I like the “fast”mode better. Below is the screen from Home Assistant showing how to configure.

Installation
If you’re uncomfortable or inexperienced working with electricity hire an experienced electrician to install your Z-Wave switch.
I’ve installed a few switches in my house before, including a Z-Wave fan switch and a GE Z-Wave dimmer switch, so I knew what I was getting myself into. This switch is going into my garage (which has some terribly gross drywall). It controls some outdoor lighting I have around my driveway. Also, the previous owners had two switches connected in series controlling the same lights. At one point I think the second switch was used for something else, but I no longer needed it. So I’ll be replacing two switches with one smart switch, giving me some extra room on my box.
After taking off the switch plate though, I noticed that the previous owners had used a low voltage box for the previous switches.

I decided while I had the power off and replacing the switch, I would replace the box as well to one that is in code. This review doesn’t go into details on how to wire up the switch, Zooz provides very nice diagrams that come with the switch explaining how to wire it. I also like this video guide for a similar switch if you are more of a video learner.

After installing the switch in the new box and turning the power back on I had a working smart switch controlling my outdoor lighting!


Home Assistant
Integrating with Home Assistant is straightforward due to the great support the ZEN22 has in OpenZWave. To pair the device, click the “Add Node” button from the Z-Wave management screen in Home Assistant and then press the “Up” paddle 3 times quickly on the switch. You should see the LED blink a few times indicating inclusion. I usually like to watch the Home Assistant Z-Wave logs during this process to see the new node getting added.
Once added, you can rename the switch to match its actual place in your home by clicking its name from the main overview view and then clicking the “gearbox” to start the rename process.
For my use case, I’m going to make two Home Assistant scenes. One for nighttime that will trigger an hour after sunset. A second scene will be for the day and will trigger an hour before sunrise.
Here is an example of an “nighttime” lighting scene.
|
1 2 3 4 5 6 7 |
--- name: Day Outdoor Lights entities: light.driveway_lantern_light: state: off transition: 5 |
And an automation triggering it an hour after sunset:
|
1 2 3 4 5 6 7 8 9 10 |
--- alias: Turn On Outdoor Lighting trigger: - platform: sun event: sunset offset: "+01:00:00" action: - service: scene.turn_on entity_id: scene.night_outdoor_lights |
The great thing about scenes is that you can add in all sorts of entities and the states you want them to be in. Home Assistant will call the right services to get them in their desired states. Check out my GitHub configuration to see my full setup.
Performance
The most important feature for Z-Wave switches is ensuring they support “Instant Status”. Basically, we want our main Z-Wave controller notified as soon as the switch changes state. If a device doesn’t support instant status, your Z-Wave controller may poll the status of the device, adding congestion to the Z-Wave network. Which could potentially slow down other devices.
All that being said, I’m really impressed with the status update time for the ZEN22. It is a good distance away from my Z-Wave controller and requires two hops to reach.

For my first test, I tried triggering the switch via Home Assistant and seeing the latency for the light to actually turn on. Of course, your situation may be different depending on the number of Z-Wave devices in your Z-Wave network, the amount of polling, the distance from your controller, etc… If you have a good Z-Wave network though, you should get a pretty much instant update at the lightbulb. Below is a short clip showing me toggling the light in Home Assistant and the bulb coming on. I’m using my laptop in the clip to toggle the switch in Home Assistant.
Next, I wanted to physically press the switch and see how fast Home Assitant updates its status. I was very pleased with the results as Home Assistant updates near-instantly. Below is a clip from the trial:
So overall, the instant status of the ZEN22 is very performant. Allowing you to reliably write automations for the dimmer without having to enable polling on the device. One thing that has always bothered me about my GE Z-Wave Dimmer switches, is that when used with a Home Assistant scene (not a Z-Wave scene), the status never seems to update without polling. This isn’t a problem for the ZEN22 though, which works great with Home Assistant scenes.
Summary
All in all, I have been very impressed with the Zooz ZEN22 Z-Wave Dimmer Switch. It has excellent performance, a main pain point with other Z-Wave switches. The switch looks nice and integrates well with your home. The configurable dimmer speed and LED settings are an added bonus as well. If you’re looking to use this in a 3-Way/4-Way/5-Way configuration, Zooz has you covered and you no longer need to buy smart switches for every box. The ZEN22 has become my go-to switch for Z-Wave lighting.
If you liked this article, you may be interested in some of my other Z-Wave related articles.
- Convert Your Pull-Chain Ceiling Fan to Z-Wave
- GE Z-Wave Plus Outdoor Smart Plug Review
- Remote USB Z-Wave Controller over TCP
If you found this review helpful, please consider supporting the blog by joining my mailing list, following the blog on social media or directly through Buy Me a Coffee. Thanks for reading!