
Last summer, I made an ESP8266 MP3 Sound Machine using ESPHome to play calming sounds when my son goes to sleep. I used ESPHome to develop the firmware so it could communicate with my Home Automation platform, Home Assistant. Well, requirements change and projects need updating. So over the holidays, I created a v2.0 of the project.
For the new version, I wanted to:
- Support two different tracks, which means a second button to toggle things on/off locally
- A better enclosure and more permanent circuit
The project still uses the DFPlayer Mini to read the MP3s to play from an SD Card and an ESP8266 NodeMCU for wireless connectivity.
My family is using this to play white noise soothing sounds for our infant to fall asleep. You could also use this as a WiFi-connected alarm clock, play dog barking as intruder prevention, or anything else where playing an MP3 off an SD card makes sense.
Hardware
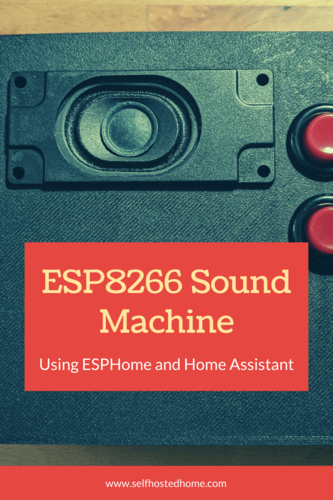
Not much changed on the hardware component side from the first version of the project. The main thing was adding a second button to support playing two different tracks.
The parts you need to build your own ESP8266 sound machine are listed below:
| Item | Comments |
|---|---|
| NodeMCU | The NodeMCU board to add WiFi connectivity and control the MP3 player. |
| SD Card MP3 Player | MP3 Player that plays from SD Card. Controllable using serial interface. |
| 3 Watt 8 Ohm Speaker | Speaker that can be used with the MP3 Player |
| Buttons | Buttons for local control |
| Protoboard | Protoboard for soldering the circuit |
The button is done the same way as before, using an internal pull-up resistor to pull the button voltage to 3.3V. When the button is pressed, the switch is closed and the pin is connected to GND so the software can detect the button press has happened.

One other change I made to the hardware was getting some new buttons that were easier to press. Getting some nice big buttons like these make them easy to press at night when trying to get the sound machine started.
Putting into Production
I also decided to make the circuit a bit more permanent by soldering everything onto a protoboard. If you read my last blog post, I was just using a breadboard, which was fine, but I wanted to make it a bit more robust. You can see on the protoboard below, the top two screw terminals go to the buttons and the bottom one goes to the speaker.


Finally, I designed a 3D enclosure to encapsulate the board. I started out with this parametric box that I customized in OpenSCAD. After exporting an STL file I then took it into Tinkercad to make cutouts on the top panel for the buttons and speaker. Having a set of digital calipers makes this pretty easy to get right without wasting a bunch of prints. Printing boxes like this usually goes smooth on my 3D printer setup.


Overall, pretty happy with how the hardware turned out on this one. It’s not the prettiest thing in the world, but it can be plugged in my son’s room and not be an eyesore or a choking hazard. The box and protoboard provide a nice permanent enclosure for the project so I know things won’t get disconnected accidentally. The SD card is still very accessible by unscrewing and taking off the top, so if I need to change the tracks that’s still pretty easy to do.
Software
A good deal changed on the software side. Previously, I was using esphome and wrote my own “Custom Output” component to use with the DFPlayer Mini. In the November 2019 1.14.0 release, the DFPlayer got its own first-class component integration. So I decided to migrate to the new component.
Adding the DFPlayer component is pretty easy. The ESP8266 talks to the DFPlayer over UART (asynchronous serial communication), so you need to enable the UART component along with the DFPlayer component. The UART component RX/TX should match your schematic.
|
1 2 3 4 5 6 |
uart: tx_pin: D2 rx_pin: D5 baud_rate: 9600 dfplayer: |
The next tricky part was integrating the buttons. For my project, I wanted each button to be tied to a track on the SD card. When you go to start one track, the other one should stop. To accommodate this, I created two switches and binary sensors.
The switches, when turned on, make sure to turn off the other switch and then start playing the track. There is a little delay here so that the DFPlayer has time to stop the previous track before starting the new one.
|
1 2 3 4 5 6 7 8 9 10 11 12 13 14 15 16 17 18 19 20 21 22 23 24 25 26 27 28 29 30 31 32 33 34 35 36 37 38 39 40 41 42 43 44 45 46 47 48 49 50 51 52 53 54 55 56 57 |
# Switches for tracks to play switch: - platform: template name: "Track 1" id: track1 optimistic: true turn_on_action: then: - switch.turn_off: track2 - delay: 1s - dfplayer.play: file: 1 loop: true turn_off_action: then: - dfplayer.stop - platform: template name: "Track 2" id: track2 optimistic: true turn_on_action: then: - switch.turn_off: track1 - delay: 1s - dfplayer.play: file: 2 loop: true turn_off_action: then: - dfplayer.stop # Physical buttons for local override binary_sensor: - platform: gpio name: Button internal: true pin: number: 5 mode: INPUT_PULLUP filters: - delayed_on: 10ms - delayed_off: 10ms on_release: then: - switch.toggle: track1 - platform: gpio name: Button internal: true pin: number: 12 mode: INPUT_PULLUP filters: - delayed_on: 10ms - delayed_off: 10ms on_release: then: - switch.toggle: track2 |
Finally, the buttons are used to just toggle the switches. They use internal pullup resistors tied to 3.3V until someone physically presses them and brings them to ground. There is a filter on each button to debounce any mechanical noise.
To see the complete ESPHome configuration, and my other ESPHome devices check out my GitHub. I manage my Home Assistant configuration and ESPHome devices through git.
Wrapping it Up
This is one of those devices that get used every day in our house. We have a “kid nighttime” scene that sets the lights in our house and starts the sound machine to start playing white noise. Having the machine controllable from Home Assistant allows you to create any sort of automation you can think of. Hope you find this ESP8266 MP3 Sound Machine design an easy project to try out and integrate into your Home Automation platform.
Thanks for reading my tutorial on how to create your own smart home sound machine. If you like ESP8266 based projects you might like these other articles on my blog:
- Chair Presence Detection using Ultrasonic Distance Sensor
- DIY WiFi Sprinkler Controller using ESP8266
- Automating a Multi-Speed Ceiling Fan with Home Assistant
Please consider supporting the blog by joining my mailing list, following the blog on social media or directly through Buy Me a Coffee. Thanks for reading!