

If you’re like me, you’ve probably got a TV or two in your house that don’t integrate well with Home Assistant or your preferred Home Automation platform out of the box. Seems like a lot of TV manufacturers make their TVs hard to automate and control by consumers. In today’s article, I’ll be installing and using a project called CEC-MQTT-BRIDGE that enables you to control your TV using CEC commands issued by Home Assistant over MQTT. All you’ll need is a Raspberry Pi hooked up to your TV to get started.
Home Assistant already comes with the HDMI CEC integration. However, this requires Home Assistant to be running on a machine directly connected using HDMI to the TV you want to control.
For my setup, a Raspberry Pi is already hooked up to my TV displaying my video surveilance system, but Home Assistant is running on another machine in my office. I’ll be installing the CEC-MQTT-BRIDGE on the Pi to enable controlling and automating the TV over the HDMI port.
By the end of this article, I will be able to tell my Google Assistant “Hey Google, show me the nursery camera” and it will turn on the TV and switch it to the correct HDMI port to show my camera stream. You can also automatically turn your TV off at night or create any other automations involving CEC commands.
Background of CEC
Consumer Electronics Control (or CEC) is a feature of HDMI to allow users to control devices through their HDMI port. If you have a Chromecast and you’ve noticed that your TV automatically switches to the correct input when your Chromecast starts playing something, that’s CEC at work. It’s part of the HDMI standard but it’s up to the manufacturer to decide what features they want to support.
There are a ton of CEC commands that your TV could support. For my TV, I’ll be using the “power on” and “change input” commands to automatically turn my TV on and switch HDMI ports. But you can do things like automatically turning your TV off, adjusting volume and play/pause/stop all over CEC. It will just take some trial and error to figure out which CEC commands your TV supports.
Companies have also added “trade names” for their implementations of CEC. Wikipedia maintains a list of these trade names for each manufacturer. See what your TV manufacturer calls CEC to figure out if your TV supports it. I have a Panasonic TV from around 2012 and all the CEC options are listed under the “VIERA Link” settings menu on my TV.
Installing on Raspberry Pi
For my setup, I’m using a Raspberry Pi connected to my TV to act as a bridge between MQTT and the CEC commands. I previously did a project using a Raspberry Pi to act as a video surveillance monitor for my TV, so I’ll be using the same Pi because it’s already connected to my TV.
Getting Dependencies Installed
If you’re starting with a fresh Raspberry Pi, I like the Raspbian Lite distribution for these type of headless projects. Go ahead and write the image to the SD card and finish the installation.
Once you can log in to your Pi (either locally or over ssh), update the Pi to the latest version of the software in the repositories.
|
1 2 |
sudo apt-get update sudo apt-get dist-upgrade -y |
Then, we will need to install git so that we can clone the cec-mqtt-bridge software we will use.
|
1 |
sudo apt-get install git |
We’ll also be using Docker to run the application, so use the docker install script to download and set up Docker. If you’ve never used Docker before, don’t worry, it will be really easy to use for this project.
|
1 2 3 4 |
# Note: You should always review scripts you download from the internet before running them. curl -fsSL https://get.docker.com -o get-docker.sh sudo sh get-docker.sh sudo usermod -aG docker pi |
Log out and log back in and you should have a working Docker installation. Run docker info to make sure everything is running okay.
Finally, clone the repository to get the latest version of the software.
|
1 |
git clone https://github.com/michaelarnauts/cec-mqtt-bridge.git |
Writing the Config File
Once you go into the cec-mqtt-bridge directory you will see a config.default.ini file. Copy that file and name it config.ini.
|
1 2 |
cd cec-mqtt-brige cp config.default.ini config.ini |
The configuraiton is pretty straightforward, here’s a copy of mine with a summary afterward.
|
1 2 3 4 5 6 7 8 9 10 11 12 13 14 15 16 17 18 19 20 21 22 23 24 25 26 27 28 29 30 31 32 33 34 35 36 37 38 39 40 41 42 43 44 45 |
; ; MQTT broker configuration ; [mqtt] ; Hostname of mqtt broker (required) broker=192.168.1.2 ; Name of your device (default=cec-ir-mqtt) devicename=cec-ir-mqtt ; Port to connect to (default=1883) port=1883 ; Use tls ;tls=0 ; Username and password ;user= ;password= ; MQTT prefix to use prefix=livingroom/tv ; ; HDMI-CEC configuration ; [cec] ; Enable CEC enabled=1 ; ID of CEC controller id=1 ; Port where the CEC-device is connected port=RPI ; Devices to query (comma seperated, defaults to all devices) ;devices=0,2,3,4,5 ; ; LIRC configuration ; [ir] ; Enable LIRC enabled=0 |
- You’ll want to enable MQTT and set the broker port and authentication settings (if you use authentication)
- The
prefixattribute will allow you to set the MQTT topic prefix for sending commands and receiving status. We’ll use this later when integrating with Home Assistant - Under the CEC section, you’ll want to enable CEC and set the ID and port. Reuse my settings if you are running on a Raspberry Pi.
- This project also supports IR, which would be an awesome addition if you have the hardware laying around. I’ll be ignoring it for now though.
Running Docker
Now that the configuration file is written, let’s build the Docker image and get it running. First, build and tag the image.
|
1 |
docker build -t cec-mqtt-bridge . |
This command will build a new docker image with your configuration file and tag it as cec-mqtt-bridge. Next, we can create a container from the image and start running our bridge.
|
1 |
docker run -d --device=/dev/vcsm --device=/dev/vchiq --restart unless-stopped cec-mqtt-bridge |
This command starts a detached container (-d) with access to /dev/vcsm and /dev/vchiq. The docker container needs access to these devices to correctly send CEC commands over the HDMI port. I also added the --restart unless-stopped so that the container will automatically start when rebooting the Raspberry Pi, unless we’ve explicitly stopped it.
Testing it Out
Using your favorite MQTT debugging tools, subscribe to all topics under your prefix to start seeing the status of the bridge and commands being run on the device. For my case, I subscribed to everything under livingroom/tv/#.
Try verifying that the CEC commands work by sending messages on the command topics. The cec-mqtt-bridge topics have some examples of the topics. For example, to turn my TV on and off I can use mosquitto_pub to send messages to the livingroom/tv/0/cmd topic.
|
1 2 3 4 5 |
# Turn TV on mosquitto_pub -h 192.168.1.2 -t "livingroom/tv/cec/0/cmd" -m "on" # Turn TV off mosquitto_pub -h 192.168.1.2 -t "livingroom/tv/cec/0/cmd" -m "off" |
Try pressing other buttons on your remote and track the messages sent while subscribed to all MQTT topics. Depending on what your TV manufacturer implemented, you’ll have an array of commands you can now issue remotely over MQTT.
For my TV, I can send the following commands to change HDMI inputs.
|
1 2 3 4 5 6 7 8 9 10 11 |
# HDMI Input 1 mosquitto_pub -h 192.168.1.2 -t "livingroom/tv/cec/tx" -m '4f:82:10:00' # HDMI Input 2 mosquitto_pub -h 192.168.1.2 -t "livingroom/tv/cec/tx" -m '4f:82:20:00' # HDMI Input 3 mosquitto_pub -h 192.168.1.2 -t "livingroom/tv/cec/tx" -m '4f:82:30:00' # HDMI Input 4 mosquitto_pub -h 192.168.1.2 -t "livingroom/tv/cec/tx" -m '4f:82:40:00' |
Experiment with the CEC-O-MATIC website to learn about different commands.
Home Assistant Integration
To integrate with Home Assistant, we can use the MQTT switch integration to control the TV. This will allow you to turn on/off the TV just like any other swtich you have set up in Home Assistant. You just need to tell Home Assistant the correct topic to send commands on and check the state on.
|
1 2 3 4 5 6 7 8 9 10 |
--- # Control the Living Room TV over MQTT using the cec-mqtt-bridge platform: mqtt name: "Living Room TV" command_topic: "livingroom/tv/cec/0/cmd" payload_on: "on" payload_off: "off" state_topic: "livingroom/tv/cec/0" availability_topic: "livingroom/tv/bridge/status" |
After restarting Home Assistant, you’ll get a new switch in your UI to control the power to the TV.

Voice Assistance
We have our nursery camera hooked up to HDMI port #4 on our TV, so we can always easily look at the nursery from the living room. I decided to add a new phrase to Google Assistant so that “Hey Google, show me the nursery” would automatically turn on the TV and switch to the right HDMI input.
To properly set this up I’ll be using IFTTT and my Nabu Casa Home Assistant Account. If you’ve never done that before, I recommend the excellent video by JuanMTech explaining the basic process.
First, I made a new applet in IFTTT to trigger whenever we say the trigger phrase.
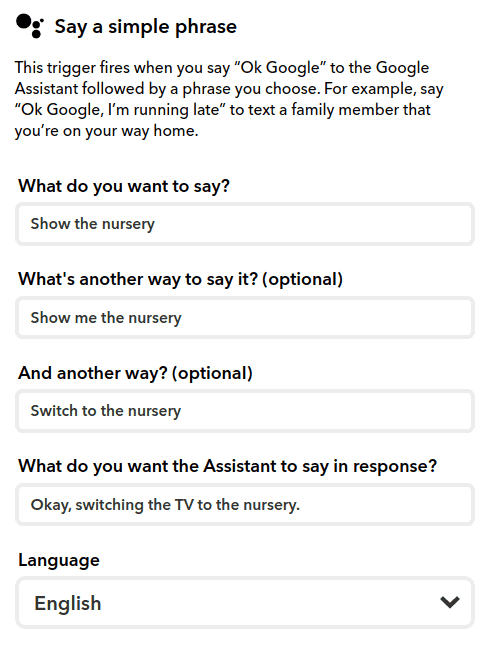
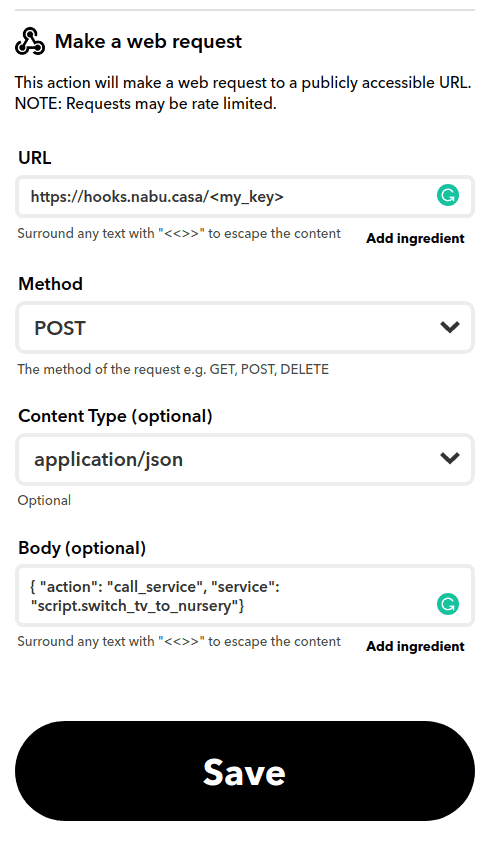
Which then calls the webhook to my Home Assistant instance. In the body of the request is the script I want to call.
This triggers an automation on my Home Assistant installation. This automation waits for IFTTT webhooks and checks the body of the message to see which script was requested. In this case, we can directly just call the script.
|
1 2 3 4 5 6 7 8 9 10 11 12 13 |
--- alias: IFTTT Switch TV to Nursery trigger: - platform: event event_type: ifttt_webhook_received event_data: action: call_service condition: condition: template value_template: "{{ trigger.event.data.service == 'script.switch_tv_to_nursery' }}" action: service_template: "{{ trigger.event.data.service }}" |
Finally, the script is called. All it does is turn on the TV using the MQTT switch, delay for a few seconds (to wait for the TV to come on) and then switch the input to HDMI4.
|
1 2 3 4 5 6 7 8 9 10 11 12 13 |
--- # Turn on the TV and switch it to the nursery switch_tv_to_nursery: alias: "Switch TV to Nursery" sequence: - service: switch.turn_on entity_id: switch.living_room_tv - delay: "00:00:15" - service: mqtt.publish data: topic: "livingroom/tv/cec/tx" payload: "4f:82:40:00" |
Parting Thoughts
I hope you enjoyed this tutorial on setting up an MQTT to CEC bridge for TV automation and integration with Home Assistant. This software could bring new life into a TV without a bunch of “smart” capability or control but still supports CEC. If you’ve got other ideas for how you’d use CEC to automate your TV, let me know in the comments.
Thanks for reading, if you like MQTT based topics you might like some of these other articles on my blog:
Please consider supporting the blog by joining my mailing list, following the blog on social media or directly through Buy Me a Coffee. Thanks for reading!