
The bathroom is a really great place to get started with Home Automation. You can automate your lights to dim when you have a late-night bathroom trip, make sure your curling iron is off when you leave the house, or what I’m doing today: turning on the bathroom exhaust fan when someone is showering.
I recently installed an Aeotec Z-Wave Multisensor in my bathroom (more on that in a future post) and wanted to create some useful automations with it in the bathroom. In today’s article, I’ll walk you through my process of collecting data about the humidity of my bathroom, some of my experimentation with Home Assistant trend sensors, and finally the automation I developed.
Plotting on Grafana
First off, I wanted to plot my humidity in Grafana for a week or so to see how humidity was changing throughout the day. If you follow my tutorials on InfluxDB and Grafana you can get this going in no time. Below is a graph showing humidity readings from the Aeotec Z-Wave Multisensor for about a week.
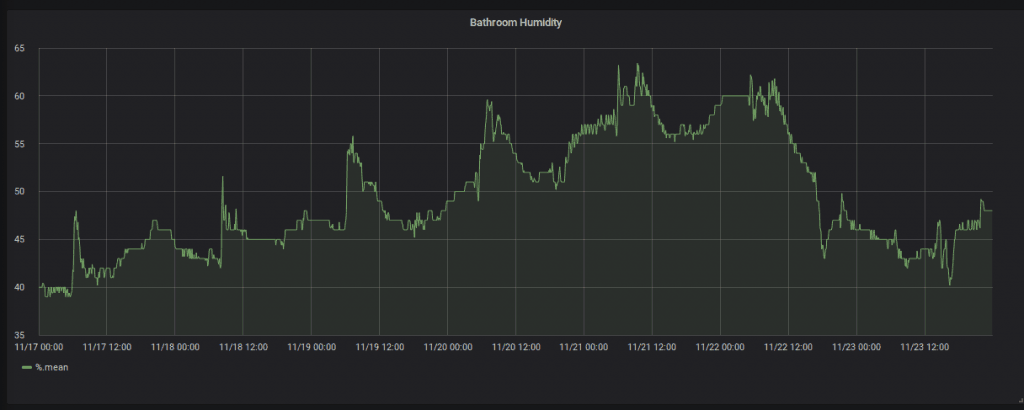
One thing you’ll notice right off the bat, is that humidify varies day to day. This means you can’t use a simple humidity threshold to trigger your automations. There are lots of variables going into what the humidity in your house is. You don’t want to run the fan nonstop to try and lower the humidity to a threshold you’ll never reach.
From the graph above, you’ll definitely notice some peaks where the shower started running and the humidity really ramped up. Even though that peak changed from day to day, it gave me hope we could successfully trigger off of these events.
Trend Sensors
Enter Home Assistant trend sensors. This binary sensor takes in the values from another sensor and determines the “trend” line for all the data points. So if the humidity is rising quickly, the trend sensor will have a larger gradient. You can think of the trend sensor as trying to calculate the slope of the data for a range of time.
The trend sensor allows you to define a range of times to use for determining the trend. To figure out what range would work best for me, I created some sensors for 1, 3 and 5 minutes. At this point, I didn’t care about the min_gradient I just wanted to start tracking the values Home Assistant calculated.
|
1 2 3 4 5 6 7 8 9 10 11 12 13 14 15 16 17 18 19 20 21 22 23 |
platform: trend sensors: master_bathroom_humidity_rising_5_min: # Measured in humidity %/second min_gradient: 0.008 sample_duration: 300 max_samples: 15 entity_id: sensor.master_bathroom_multisensor_relative_humidity friendly_name: Master Bedroom Humidity Rising (5 Mins) master_bathroom_humidity_rising_3_min: # Measured in humidity %/second min_gradient: 0.008 sample_duration: 180 max_samples: 15 entity_id: sensor.master_bathroom_multisensor_relative_humidity friendly_name: Master Bedroom Humidity Rising (3 Mins) master_bathroom_humidity_rising_1_min: # Measured in humidity %/second min_gradient: 0.008 sample_duration: 60 max_samples: 15 entity_id: sensor.master_bathroom_multisensor_relative_humidity friendly_name: Master Bedroom Humidity Rising (3 Mins) |
The trend sensors are just binary sensors that go “on” when the gradient they calculate reaches a threshold. They have a state attribute though that contains the most recent calculation. I wanted to plot this over some real data so I could tell what gradient would make a good threshold for my automations. So I created custom template sensors to use that state attribute.
|
1 2 3 4 5 6 7 8 9 10 11 12 13 14 15 16 17 |
platform: template sensors: bathroom_humidity_trend_5_min: friendly_name: Bathroom Humidity Trend 5 Minutes unit_of_measurement: "%/s" value_template: >- {{ state_attr('binary_sensor.master_bathroom_humidity_rising_5_min', 'gradient') }} bathroom_humidity_trend_3_min: friendly_name: Bathroom Humidity Trend 3 Minutes unit_of_measurement: "%/s" value_template: >- {{ state_attr('binary_sensor.master_bathroom_humidity_rising_3_min', 'gradient') }} bathroom_humidity_trend_1_min: friendly_name: Bathroom Humidity Trend 1 Minutes unit_of_measurement: "%/s" value_template: >- {{ state_attr('binary_sensor.master_bathroom_humidity_rising_1_min', 'gradient') }} |
I also added them to the InfluxDB component so that they were stored in my InfluxDB database which I could then visualizing using Grafana.
Analyzing the Graph
After making these new sensors I plotted the values over a few days. The green line still shows the humidity reading. The yellow and blue lines show the trend calculations for 3 and 5 minutes respectively.
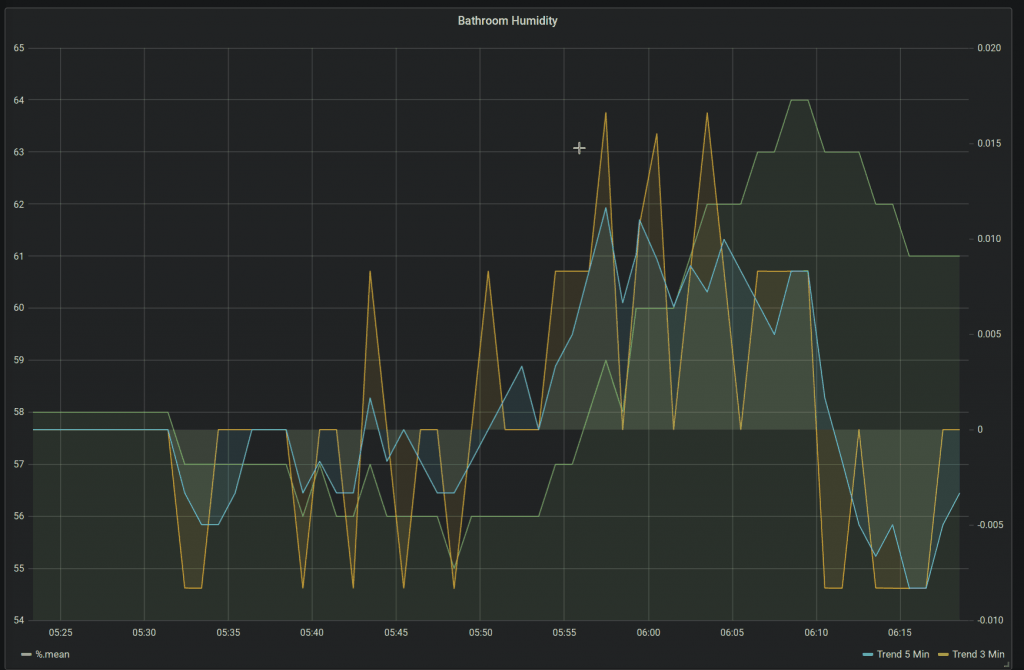
What I’m looking for here is which trend sensor has a threshold most consistent with when are actually showering and the humidity is rising. In the graph above, the yellow line shows the current trend calculation (values are on the right-hand axis). You can see it reaches about 0.008 a few times whenever the humidity is moving up and down. You can see the humidity starts to rapidly rise between 5:55 and 6:10 right after the shower is started. The yellow trend line goes over 0.015 %/s during this rapid increase.
I decided to use the 3-minute trend sensor with a minimum gradient of 0.012 to trigger my automations. The 5 minute (blue line) in the graph also looks promising using a minimum gradient of 0.005 or so.
Automation
For more complex Home Assistant automations, I prefer writing them in AppDaemon. AppDaemon provides a python API to Home Assistant for writing automations. If you already know Python and have a complex idea for an automation that would be hard to express with YAML, give AppDaemon a try. I’ve got a tutorial on using it to write a Telegram bot.
Whenever humidity is rising rapidly in the bathroom (more than likely due to a shower) I want to make sure the fan is running. I want the fan to stop automatically once the humidity level has reached within 10% of the humidity when the fan started. If someone turns on the fan manually, I also want it to follow the same rules. Here’s the AppDaemon app I came up with:
|
1 2 3 4 5 6 7 8 9 10 11 12 13 14 15 16 17 18 19 20 21 22 23 24 25 26 27 28 29 30 31 32 33 34 35 36 37 38 39 40 41 42 43 44 45 46 47 48 49 50 51 52 53 54 55 56 57 58 59 60 61 62 63 64 65 66 |
import appdaemon.plugins.hass.hassapi as hass class BathroomVentFan(hass.Hass): """Automatically turn on bathroom vent fan when humidity rises""" def initialize(self): self.fan = self.args["fan"] self.trend_sensor = self.args["trend_sensor"] self.humidity_sensor = self.args["humidity_sensor"] self.max_timer_handle = None self.min_timer_handle = None self.on_min_time = False self.humidity = None self.fan_running = False # If the fan is turned on manually or the trend sensor goes on, start # the fan self.listen_state(self.turn_on, entity=self.fan, new="on") self.listen_state(self.turn_on, entity=self.trend_sensor, new="on") self.listen_state(self.humidity_change, entity=self.humidity_sensor) @property def humidity_max(self): return self.humidity * 1.05 def turn_on(self, entity, attribute, old, new, kwargs): if not self.fan_running: self.log("Turning on") self.call_service("fan/turn_on", entity_id=self.fan) self.fan_running = True # Save the current humidity reading so we can run the fan until we are # close to this again. self.humidity = float(self.get_state(self.humidity_sensor)) # Set a timer to not run the fan for more than an hour self.max_timer_handle = self.run_in(self.turn_off, 60 * 60) # Set a timer to always run at least 10 minutes. Don't want the fan # going on and off constantly. self.on_min_time = False self.min_timer_handle = self.run_in(self.hit_min_time, 60 * 10) def turn_off(self, kwargs): if self.on_min_time and self.fan_running: self.call_service("fan/turn_off", entity_id=self.fan) # If we were turned off before the timer expired, cancel it self.cancel_timer(self.max_timer_handle) # Reset variables self.max_timer_handle = None self.humidity = None self.fan_running = False def hit_min_time(self, kwargs): self.on_min_time = True self.min_timer_handle = None def humidity_change(self, entity, attribute, old, new, kwargs): """When the humidity changes, check if it is within the threshold to turn off.""" if float(self.get_state(self.humidity_sensor)) < self.humidity_max: self.turn_off(kwargs) |
The automation should be pretty straightforward. If someone manually turns on the fan or the trend sensor comes on, we turn on the fan, record the current humidity and start a timer. Whenever the humidity changes, we compare it against the original humidity to see if we get within the threshold. Once we’re back in the threshold we turn off the fan.
I also create a minimum on-time timer, so that if the fan comes on either by someone pressing it manually or by an automation, it at least stays on for 10 minutes before it can be turned back off. I didn’t want people manually turning on the fan just for the automation to turn it off a minute later with a new humidity reading.
And to run the app I pass in the Home Assistant entities it should use.
|
1 2 3 4 5 6 |
bathroom_vent_fan: module: bathroom_vent_fan class: BathroomVentFan fan: fan.bathroom_vent_fan trend_sensor: binary_sensor.master_bathroom_humidity_rising_3_min humidity_sensor: sensor.master_bathroom_multisensor_relative_humidity |
Conclusion
I hope you enjoyed my walkthrough of how I collected data and created an automated bathroom exhaust fan while people are showering. So far I’ve been happy with the Aeotec Multisensor 6 and this first automation I created using it. I think the bathroom is a great place to start with Home Automation and there are lots of useful automations you can create. I’ll be looking at using the motion sensor in the Aeotec Multisensor in a future article to automate the lighting.
If you liked this article, you might some of these other ones from my blog:
- Convert Your Pull-Chain Ceiling Fan to Z-Wave
- Automating GameDay
- Automating a Multi-Speed Ceiling Fan with Home Assistant
If you found this tutorial helpful, please consider supporting the blog by joining my mailing list, following the blog on social media or directly through Buy Me a Coffee. Thanks for reading!