

How are you storing data collected in your Home Automation? Today’s article looks at a time series database called InfuxDB that Home Assistant can use to store all your sensor data in a database. Once the data is stored in the database you can analyze it for trends, create graphs and use the data in other applications. Ever feel restricted by the Home Assistant UI on how it shows data over a long time? InfluxDB is a tool to help you solve that!
InfluxDB
InfluxDB is an open source time series database, which makes it useful for recording metrics, events and performing analytics. If you’re familiar with relational databases like MySQL or PostgreSQL, InfluxDB is similar but excels at managing time series data. This makes it excellent at storing our sensor data from Home Assistant, because naturally all our sensor data is associated with time of measurement.
Home Assistant comes with a recording component already, however, the more data that your Home Assistant setup records, you’ll see the limitation of this built-in functionality. Moving to InfluxDB will improve performance which will allow you to store data over a longer period of time.
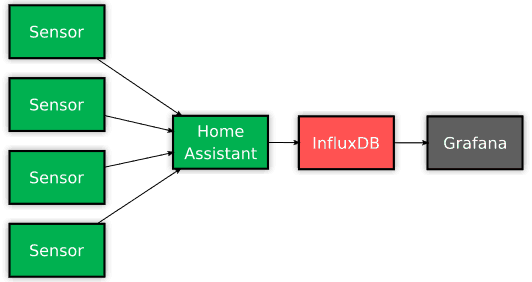
Looking at the flow chart below shows where InfluxDB sits in the flow of data for Home Automation. Home Assistant does the hard work of collecting data from all the sensors and aggregating it, we can then store it in the InfluxDB database. Then, other apps (like Grafana) can query the database to create visualizations.
Setup
Let’s break down the setup into separate steps for creating the database and then hooking it up to Home Assistant. Remember, you don’t need to be running Home Assistant and InfluxDB on the same server, that’s just how I’ve got it currently set up.
Docker
I’m using docker on my Raspberry Pi 3+ right now to manage my Home Assistant configuration. This tutorial is going to outline how to add InfluxDB to the docker-compose.yml file and setup on a Raspberry Pi.
First off, we’ll grab the docker image that will have the InfluxDB installation. There are a couple of InfluxDB docker images floating around for the Raspberry Pi, but I went with this one. You can pull down the image on your Raspberry Pi by running:
|
1 |
docker pull martin211/rpi-influxdb |
Docker should download the image from Docker hub and extract it on your Pi.
Next, we can add InfluxDB to our docker-compose.yaml file so docker will run the image. Reading through the Home Assistant documentation on InfluxDB we need to have a database named home_assistant created on InfluxDB. We can accomplish that with the docker-compose config below:
|
1 2 3 4 5 6 7 8 9 10 11 12 13 14 15 16 17 18 19 20 21 22 23 24 |
version: "3" services: homeassistant: image: homeassistant/raspberrypi3-homeassistant:0.71.0 volumes: - /home/pi/home-assistant-config/configuration:/config - /etc/localtime:/etc/localtime:ro network_mode: "host" ports: - "8123:8123" devices: - "/dev/ttyACM0:/dev/zwave:rmw" depends_on: - influxdb influxdb: image: martin211/rpi-influxdb:latest volumes: - /var/influxdb:/data network_mode: "host" ports: - "8086:8086" environment: - "PRE_CREATE_DB=home_assistant" |
So let’s break this configuration down a bit:
- The first service mentioned is the Home Assistant service. If you are already ready using docker-compose you probably already have something similar. One thing you should add to your Home Assistant service is the
depends_onattribute as seen above. This tells docker about the relationship between the two containers. - The second service is our new InfluxDB service
image: states our Docker image we want to use, in this case it’s the InfluxDB image built for the Raspberry Pivolumes: allows us to mount some persistent storage within the container. In this scenario, InfuxDB will store it’s data in/var/influxdbon the host sideports: Home Assistant will need to be able to access the InfluxDB port so we forward the portenvironment: sets the environment variables. This Docker image looks at thePRE_CREATE_DBenvironment variable to determine the name(s) of databases to create. We want to set this tohome_assistantto set up our database.
To boot up InfluxDB run:
|
1 |
docker-compose up -d influxdb |
The docker containers start up. To test that InfluxDB is working correctly and the database was created we can use its REST API. Run a quick curl command to query for the databases created:
|
1 2 |
$ curl "http://localhost:8086/query?q=show+databases" {"results":[{"statement_id":0,"series":[{"name":"databases","columns":["name"],"values":[["home_assistant"],["_internal"]]}]}]} |
Now that we know InfluxDB is up you can boot up Home Assistant:
|
1 |
docker-compose up -d homeassistant |
Note that InfluxDB must be up and running before Home Assistant, how ever you start your Docker containers on reboot will need to account for this.
Home Assistant
Now that our database is created and listening on port 8086 we can tell Home Assistant to start using it. To do so, modify your Home Assistant configuration.yaml to include the details of your InfluxDB installation.
Check the InfluxDB documentation on Home Assistant for the complete list of configuration. A very simple setup could look like the one below.
|
1 2 3 4 |
influxdb: host: localhost port: 8086 database: home_assistant |
After modifying your Home Assistant config be sure to restart Home Assistant (I usually do this through the Configuration UI). If all worked well your Home Assistant UI will boot back up and you won’t see any error messages.
After a few minutes Home Assistant will start pouring sensor data into your new InfuxDB database. Let’s try a few more InfluxDB APIs to make sure everything is working.
First, let’s query InfuxDB and look at all the different sensor data it is storing.
|
1 |
curl -G "http://localhost:8086/query?pretty=true" --data-urlencode "db=home_assistant" --data-urlencode "q=SHOW MEASUREMENTS" |
You should get a response back with a list of measurements being taken. Choose your favorite one and we can query for the data stored for that measurement. For example, I’m querying below for all the “mph” measurements (which were created using Dark Sky).
|
1 |
curl -G "http://localhost:8086/query?pretty=true" --data-urlencode "db=home_assistant" --data-urlencode "q=SELECT * FROM \"mph\"" |
If data is showing up than your Home Assistant and InfluxDB configuration is working. In the next blog post, I’ll detail how we can use Grafana to further visualize the data, rather than using command line queries. Let me know in the comments below how you’ve used InfluxDB.