
Home Automation projects are rarely “complete”. They evolve over time. A few weeks ago I posted an article about creating a DIY garage door opener using MicroPython. Since then, I received lots of awesome feedback from the community and improved the design. I’ve summarized the feedback into 4 essential tips for improving your DIY Home Automation project.
- Use PlatformIO for Build Environment
- Add temperature and humidity sensors
- Update your firmware over WiFi using over the air updates
- Add a heartbeat
Check out the original article on how to create DIY Smart Garage Door Opener if you haven’t already, to get a starting point for this project. These could also be applied to my DIY Bed Presence Detection solution or any other DIY home automation project you’re working on.
Moving to PlatformIO Build Environment
The first major change that happened was actually moving my DIY Garage Door implementation from the MicroPython code I discussed in the last post to using the Arduino framework. I think the MicroPython port to the ESP8266 just isn’t stable enough for my liking yet. The device was frequently resetting, causing the device to be unstable. I really like the MicroPython project and will definitely be following it and trying it again in the future.
So what is PlatformIO? You can think of it as a library management and build system for Arduino. There are two big benefits for my workflow over using the traditional Arduino IDE.
- Library management is super easy. You can put what libraries you depend on into a
platformio.inifile in your repository, so anybody using your code can easily get the libraries you use. There have definitely been improvements to the Arduino IDE the last few years for this. However, I really like having a file checked into the repository explicitly stating the libraries and versions. - It allows me to use whatever text editor I want and build from the command line. If you already use another text editor (vim, emacs, Sublime Text, …) and you want to use that for Arduino programming, PlatformIO makes it really simple to edit your code and then invoke the commands from a shell to build and upload the firmware.
First off, you need to install PlatformIO. They have some great documentation on how to get started installing it, and I tend to just use the PlatformIO command line interface, rather than any of the IDE integrations, but definitely check those out too!
You also need to create a platformio.ini file in the root of the project directory. For working with the NodeMCU and Arduino software you can get a basic setup using the below as a starting point.
|
1 2 3 4 5 6 7 |
[platformio] env_default = nodemcuv2 [env:nodemcuv2] platform = espressif8266 framework = arduino board = nodemcuv2 |
Like I mentioned before, one awesome part of PlatofrmIO is the ability to easily add library dependencies. Check out my git repository showcasing my smart bed sensor to see how I pull in libraries for the software.
Adding Temperature and Humidity Sensor
If you have spare pins on your microcontroller, consider adding temperature and humidity sensors to your project to gather additional data. I added them on to my garage door opener, even though I have no plans to use the data (yet).
I landed on using the DHT22 temperature and humidity sensor. The home automation community has already written several software libraries for the sensor. I used the DHT Sensor Library for Arduino from Adafruit. The relevant code from the project:
|
1 2 3 4 5 6 7 8 9 10 11 |
static int loops = 0; if (loops == NUM_LOOPS_TEMP) { client.publish(TEMP_STATE_TOPIC, String(dht.readTemperature(true)).c_str(), true); client.publish(HUMIDITY_STATE_TOPIC, String(dht.readHumidity()).c_str(), true); loops = 0; } loops++; |
Temperature and humidity have their own MQTT topics. We simply read the values using the library and publish to the correct topics. Because I don’t want to read the values every iteration of the loop() function (the DHT22 should be read max once per second), I count how many loops have occurred and only read the temperature sensor and publish once NUM_LOOPS_TEMP loops have occurred (this is set to 50 in my default config.h).
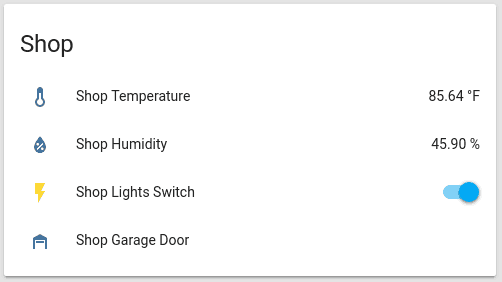
On the Home Assistant side, these are relatively easy to add as MQTT sensors.
|
1 2 3 4 5 6 7 8 9 10 11 12 13 14 15 |
--- - platform: mqtt name: 'Garage Temperature' state_topic: 'home/garage/temperature' availability_topic: 'home/garage/temperature/available' unit_of_measurement: '°F' device_class: 'temperature' - platform: mqtt name: 'Garage Humidity' state_topic: 'home/garage/humidity' availability_topic: 'home/garage/humidity/available' unit_of_measurement: '%' device_class: 'humidity' |
Which renders nicely in the Home Assistant UI:
Adding Over the Air Updates
So you finished writing your application, got it all programmed and wired up. But then you find a bug. Or maybe the IP address for your MQTT broker changes. Or you want to add another command topic for the device. Like I mentioned in the introduction, I find that most Home Automation projects are never complete. To make it easier to upgrade these devices we can utilize something called “Over the Air” updates.
Traditionally when you want to flash a new version of your software to an ESP8266 or any microcontroller you load it over USB. Over the air updates work the same way, but over WiFi instead!
This allows us to keep the device all wired up in its final location and deploy firmware images from the computer that did the compilation.
For the ESP8266, the Arduino framework supports over the air (OTA) updates. To setup OTA you can add the following function and call it from your setup() function.
|
1 2 3 4 5 6 7 8 9 10 11 12 13 14 15 16 17 18 19 20 21 22 23 24 25 26 27 28 29 30 31 32 33 34 35 36 37 38 39 |
#include <ArduinoOTA.h> void setupOTA() { ArduinoOTA.setPort(OTA_PORT); ArduinoOTA.setHostname(HOSTNAME); ArduinoOTA.onStart([]() { Serial.println("Starting"); }); ArduinoOTA.onEnd([]() { Serial.println("\nEnd"); }); ArduinoOTA.onProgress([](unsigned int progress, unsigned int total) { Serial.printf("Progress: %u%%\r", (progress / (total / 100))); }); ArduinoOTA.onError([](ota_error_t error) { Serial.printf("Error[%u]: ", error); if (error == OTA_AUTH_ERROR) { Serial.println("Auth Failed"); } else if (error == OTA_BEGIN_ERROR) { Serial.println("Begin Failed"); } else if (error == OTA_CONNECT_ERROR) { Serial.println("Connect Failed"); } else if (error == OTA_RECEIVE_ERROR) { Serial.println("Receive Failed"); } else if (error == OTA_END_ERROR) { Serial.println("End Failed"); } }); ArduinoOTA.begin(); } void setup() { // Other setup code setupOTA(); } void loop() { // Other loop code ArduinoOTA.handle(); } |
Most of the code is fairly boilerplate and reusable from project to project. The piece to keep in mind is that the function must be called during your setup() and there are two config values OTA_PORT and HOSTNAME. When you perform the update later, you’ll need these values to connect to the device.
In the loop() function you must also call the ArduinoOTA.handle() that will check if any OTA requests and start processing the firmware upgrade.
Programming Over the Air
Now that the device is ready to accept OTA upgrades we need to actually learn how to deploy code. If you’re using PlatformIO this becomes super easy, you can change your command to run to something like:
|
1 |
platformio run --target upload --upload-port esp8266-shop.local |
Note the string after --upload-port needs to match your hostname for the deployed device. For my example esp8266-shop was the hostname and I can use the .local domain so that my computer knows the hostname is on the LAN. You can also just use the IP address of the device here instead of using the hostname.
If you are using the traditional Arduino IDE you can choose to flash over OTA by choosing your board from the “Tools -> Port” menu.
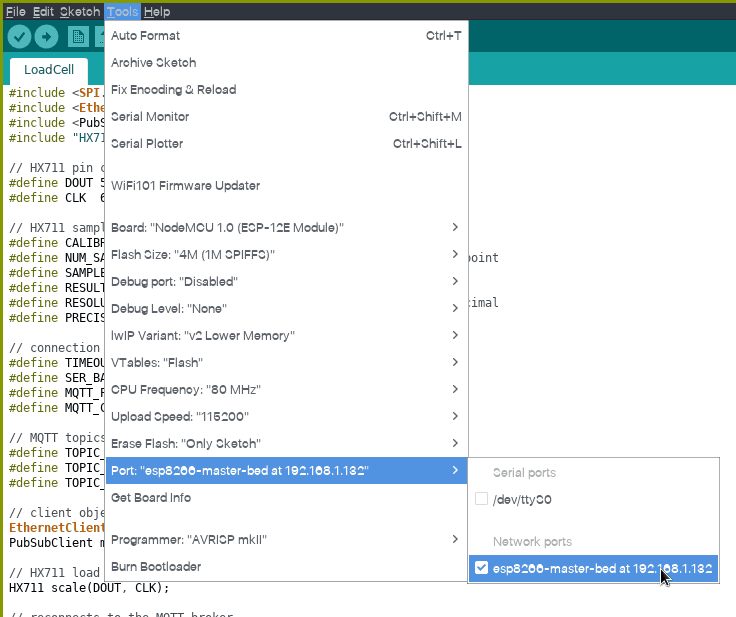
Either way, the program is compiled and then uploaded to the device. Afterward, the device resets and starts running your new code!
Adding a Heartbeat
This last tip gives great feedback when the device is actually deployed and is really easy to implement. Adding a heartbeat to the device using an LED allows us to visually see that the device is still operational. According to Wikipedia, a heartbeat is “is a periodic signal generated by hardware or software to indicate normal operation or to synchronize other parts of a computer system.”
Most microcontrollers (like the ESP8266) come with an onboard LED that we can use in our application. We can simply toggle the LED once per loop. This allows us to quickly look at the device and know that it’s still working. If the device froze up or reset for any reason, the loop() function won’t be running and the LED won’t be blinking letting us know something went wrong on the device.
Code for this is pretty easy, we just need to set the LED pin as an output and toggle it every iteration of the loop.
|
1 2 3 4 5 6 7 8 9 10 |
void setup() { // Setting up heartbeat pinMode(LED_BUILTIN, OUTPUT); } void loop() { // Heartbeat digitalWrite(LED_BUILTIN, !digitalRead(LED_BUILTIN)); delay(250); } |
Wrapping it Up
Hopefully, these tips prove useful for your next project. If you have any other general tips you’d like to share feel free to leave a comment or send me some on social media!