
Ever want to create an automation around someone sitting on a chair or laying in bed? Using an ESP8266, load cells, an MQTT broker and Home Assistant you can create a DIY weight sensor attached to your bed to form a smart bed! This that will allow you to detect these events and trigger automations.
While you could use this to accurately measure the weight of something, I’m focused on detecting presence on a piece of furniture. You can use this data to create automations based on where people are currently located in your home.
Some hardware you’ll need:
Shout out to reddit user Party_Engineer who put together the original design that inspired my implementation.
If you haven’t setup an MQTT broker be sure to check out my article on Setting up MQTT Broker for DIY Home Assistant Sensors.
Hardware Prototyping
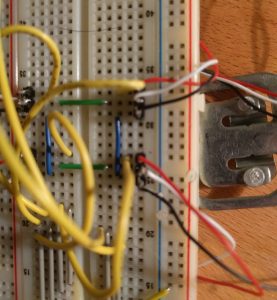
To create a weight sensor we can use load cells in an H-bridge circuit. You can use up to 4 load cells to accurately measure a weight, for this article I’m going to be putting them under our bed. During prototype and development, I was mostly working off using a chair to make it easier to manage, but the concept is still the same. You could also use a couch or any other piece of furniture.
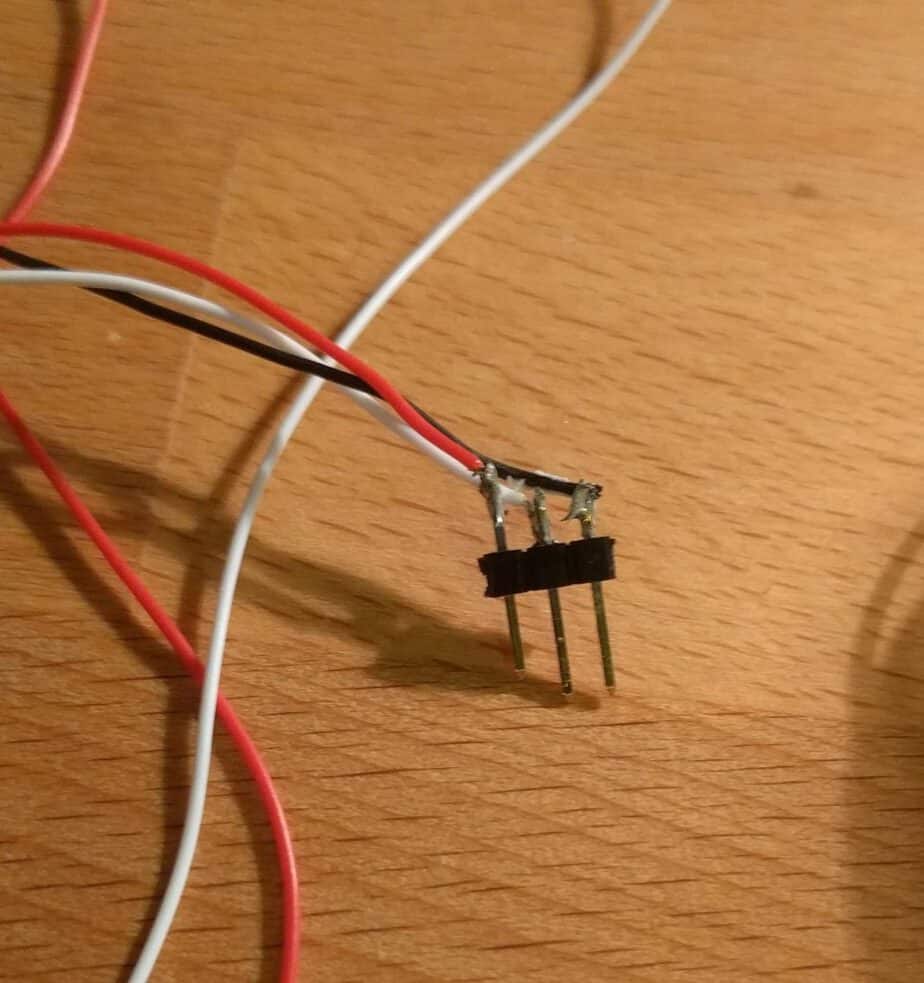
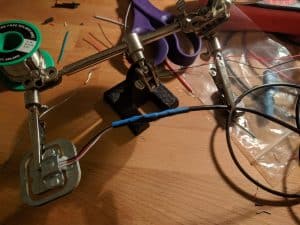
Once I received the load cells I soldered some male jumper pins to the ends to easily plug them into a breadboard to do development and testing.
Holding the Load Cell
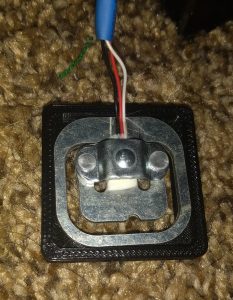
You’ll also need some holders for the load cells, they don’t work nearly as well if they are just sitting flush on the floor. They need to have some gap from the floor so that the load cell can flex well and create an accurate measurement. Luckily, the community has some great 3D printed designs for these load cells. These are some that should match the load cells I used.
If you don’t have a 3D printer (like me…) I’d recommend checking out 3D Hubs which allows you to upload a design and order it from a local 3D printing service. Also, your local library may provide 3D printing services.
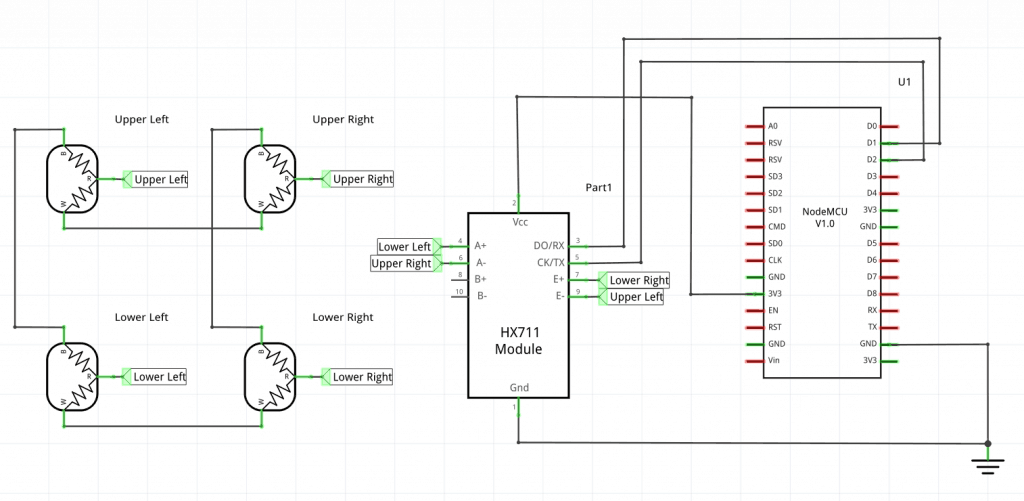
Schematic
After attaching the load cells to the pressure points, it’s easy to wire up all the cells as an H-bridge circuit. This circuit essentially creates an analog voltage indicating the weight detected by the load cells. The HX711 ADC converts the analog value to a digital value that the microcontroller can read. See the below schematic for how to wire up the load cells.
The schematic may look a little complicated at first glance, but really you need to just focus on attaching the red wires from the load cells to the correct inputs to the HX711 and then connecting the black and white wires to their correct counterparts.
Finally, a microcontroller reads the digital value created by the ADC over serial communication. Overall this is a pretty cheap project that allows to accurately detect presence on a piece of furniture. It can also be pretty easily hidden so it doesn’t become an eyesore.
Software
For this project, I’m using the Arduino framework for the ESP8266 with the HX7111 and PubSubClient libraries. All of my source code can be found on GitHub. I prefer to use Platformio to manage my library dependencies and build my software. Within the repository there is a platformio.ini file that defines the libraries to include in the project, it should be a good starting point for you too. Check out the Readme in the GitHub repository for some more information.
Let’s walk through the most interesting pieces of the code.
ADC Measurements
The HX711 library allows us to easily communicate between the ESP8266 and the HX711 that is measuring the load sensors. To get started with the ADC, we include a header file and create a global variable initialized with the pins used in our design. I’m using #define statements in the config.h file to define the pins to use for data and clock when communicating with the ADC.
|
1 2 3 |
#include <HX711.h> HX711 scale(HX711_DT, HX711_SCK); |
Reading from the ADC is easy as well. In the loop() the code reads from the HX711 using the read_average() method. This method tells the ADC how many samples of the weight to do and average the results. Mine currently takes 5 measurements for the average.
Once the measurement is done, we compare it to the most recently published value and see if the difference is a significant amount (in my case I check for a difference of 500). If there is a significant difference, the value is published on an MQTT topic and the lastValue is set. This limits the amount of MQTT messages sent, if we sent every measurement there would be unnecessary traffic. At the end of loop we let the ADC sleep for a second.
|
1 2 3 4 5 6 7 8 9 10 11 12 13 |
value = scale.read_average(5); Serial.println(value); // Only publish new value if difference of 500 or more if (abs(lastValue - value) >= 500) { String value_str = String(value); client.publish(STATE_TOPIC, (char *)value_str.c_str()); lastValue = value; } scale.power_down(); // put the ADC in sleep mode delay(1000); scale.power_up(); |
Notice that this is just the raw value from the ADC, we don’t do any conversions here to weight. I decided to do that on the Home Assistant side. My reasoning is that if the weight of the bed changes (more/less pillows, change sheets, etc..) I’d rather modify the Home Assistant sensor rather than flashing new firmware to the device. I’m also not interested in getting very accurate weights using this. I’m just looking to determine if people are in bed or not.
The rest of the Arduino code is not particularly interesting, most of it is setting up the WiFi connection, MQTT initialization and OTA support. Check out the code on GitHub, I’ve tried to comment it so it’s easy to follow.
Home Assistant Sensors
To integrate with Home Assistant the ESP8266 acts as an MQTT sensor and continuously publishes data to the MQTT broker. Using Home Assistant template sensors, we take that raw value and convert it into more meaningful sensors.
Because I weigh considerably more than my wife, we can look at a couple thresholds of the raw values to accurately determine who is in bed at any given time. First, we need an MQTT sensor to read the raw values the ESP8266 is sampling and publishing.
|
1 2 3 |
- platform: mqtt state_topic: 'home/bedroom/bed' name: "Raw Master Bed Weight Measurement" |
Now, you should move the load cells into their final resting place so you can start getting accurate measurements. I put the load cells under the feet of my bed, plugged in the NodeMCU and started looking at the raw data through Home Assistant. I looked at the values for when the bed was empty, only my wife, only me and both of us in bed. After averaging a few different measurements I came up ranges that made sense for our setup.
| Range | Status |
|---|---|
| 0 - 2973714 | No one in bed |
| 2973715 - 3844334 | Wife in bed |
| 3844335 - 4701333 | Husband in bed |
| 4701334+ | Both in bed |
I created two binary template sensors for detecting when one of us are in bed.
|
1 2 3 4 5 6 7 8 9 10 11 12 13 14 |
--- - platform: template sensors: zack_in_bed: friendly_name: "Zack in Bed" value_template: > {{ states('sensor.raw_master_bed_weight_measurement')|float >= 3844335 }} nicole_in_bed: friendly_name: "Nicole in Bed" value_template: > {{ states('sensor.raw_master_bed_weight_measurement')|float > 2973715 and (states('sensor.raw_master_bed_weight_measurement')|float < 3844335 or states('sensor.raw_master_bed_weight_measurement')|float >= 4701333)}} |
Finally, I made a template sensor to count how many people are in the bed.
|
1 2 3 4 5 6 7 8 9 10 11 12 13 |
- platform: template sensors: num_in_master_bed: friendly_name: "Number of People in Bed" unit_of_measurement: 'people' value_template: >- {% if is_state('binary_sensor.zack_in_bed', 'on') and is_state('binary_sensor.nicole_in_bed', 'on') %} 2 {% elif is_state('binary_sensor.zack_in_bed', 'on') or is_state('binary_sensor.nicole_in_bed', 'on') %} 1 {% else %} 0 {% endif %} |
Below is a screenshot of the Home Assistant UI while I was in bed testing it out:
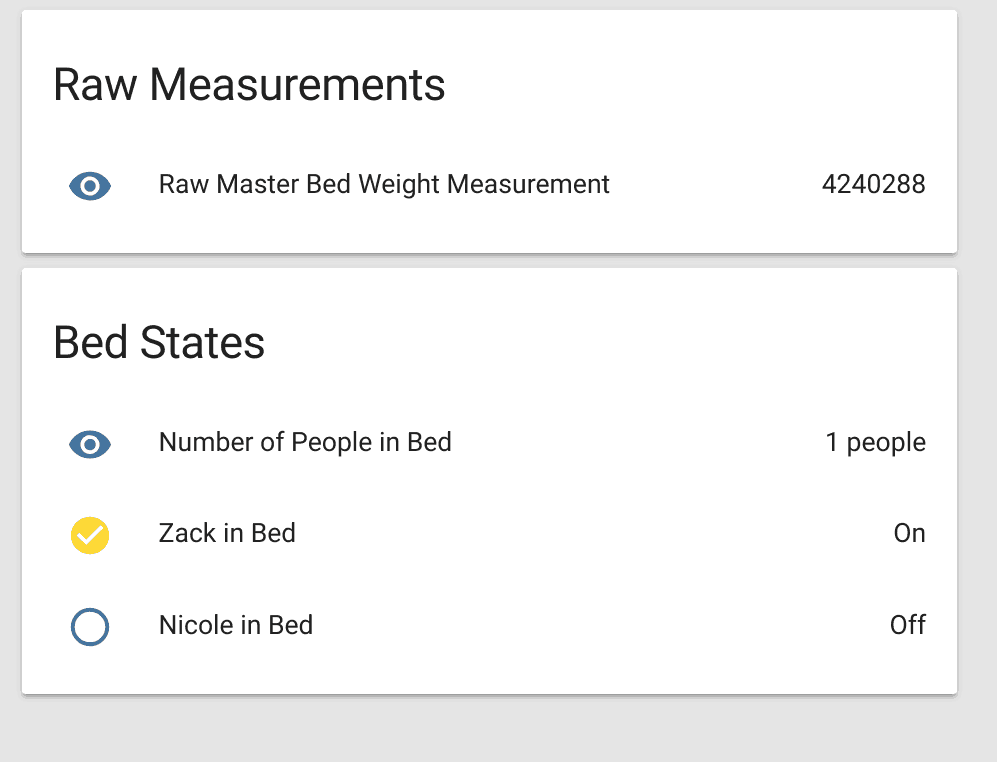
The UI could be improved, but it serves it’s purpose and gives a quick view of the status.
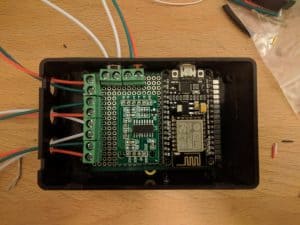
Putting the Smart Bed into Production
Now that the software is ready, it’s time put the hardware into production. I used the following to create my final board. There are a ton of different ways to accomplish this, so definitely modify this to what you have on hand.
| Item | Comments |
|---|---|
| Protoboard | Used to solder down the ESP8266 and HX711 |
| Standoffs | Standoffs to attach the protoboard to the case |
| Heat Shrink Tubing | Heat Shrink Tubing for creating the Load Cell connectors |
| Wire | 3 Core Wire for connections between load cells and HX711 |
| Screw Terminals | Screw terminals for connecting wires to protoboard |
| 3 Pin Connectors | Connectors for Load Cells |
| Project Boxes | Box to enclose everything in. Could use a 3D printer if you have one instead. |
Basically, I soldered the ESP8266 and HX711 to a protoboard. I then added screw terminals to use as connection points for all the load cells. On the bottom side of the protoboard, I soldered wires between the screw terminals and the pins of the HX711.
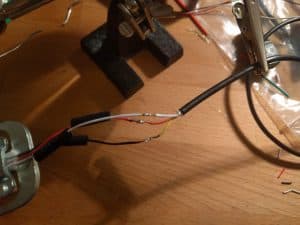
I used the wire linked above and on one side connected the load cells and on the other put one of the 3 wire connectors. Here’s some soldering fun in action:
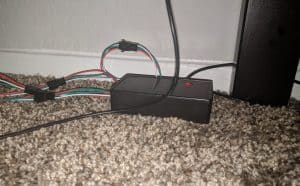
Finally, I put the load sensors under the bedposts and powered it up!
Automations
So what can we do with this? Some automations I’ve thought of (and soon implementing…)
- Detect when you’re in bed for the night. Automatically start “goodnight” scene to turn off lights, lock doors and get the house ready for the night. An additional condition could check the time so that you don’t trigger when taking a nap in the middle of the day.
- Along with the first suggestion, detect when you leave the bed at night. Trigger soft lighting to navigate your house if the bed changes from occupied
to unoccupied. - Detect when you wake up in the morning, automatically start your morning routine and scenes.
- Detect when your dog gets on the couch when you’re not home. Play a recording of your voice telling him/her to get off the couch until they do.
Let me know of other good ideas in the comments!