
For some upcoming projects, I’m going to make some DIY sensors and switches using the ESP8266 NodeMCU. It’s a pretty cheap board that is based on the ESP8266 which has built-in WiFi. In this post today I’m going to be getting a brand new “ESP8266 NodeMCU” up and running with MicroPython. MicroPython allows you to write microcontroller code using Python instead of using C or the Arduino libraries.
To get started you’ll need:
There are lots of other ESP8266 boards floating around the internet so if you decide to go with a different board I would just ensure it comes with at least 1Mbyte of flash so you can run the full version of MicroPython.
Once the firmware is correctly flashed to the device we’ll be running Python code using the Read Eval Print Loop (or REPL for short) which allows us to type in Python code directly to execute. We’ll be able to access the REPL over a serial and Web interface. Once that’s working we can upload a new boot script so the device automatically connects to your WiFi.
Loading ESP8266 Firmware
You need a tool called esptool to download MicroPython to the board. There are some instructions on the GitHub page, most of the time you can just install it globally on your machine using:
|
1 |
pip install esptool |
Next, you need to determine the usb port that the ESP8266 is plugged into. A quick way on a Linux box is to run ls /dev/tty* to see available ports. You can run the command with it unplugged and plugged in to see what got added. In my case, the board is at /dev/ttyUSB0.
Now that the port is determined we can erase the flash on the board. We use esptool to do this. Make sure to change the port to match your setup.
|
1 |
esptool --port /dev/ttyUSB0 erase_flash |
You should get a confirmation saying that chip erase completed successfully. Now, we need to get the latest firmware image for MicroPython. Check out the download page for the latest firmware for the ESP8266. Download the .bin file. Then we can flash the firmware using esptool again. Update the port to match your setup and the put the path to your .bin file you just downloaded.
|
1 |
esptool.py --port /dev/ttyUSB0 --baud 460800 write_flash --flash_size=detect 0 esp8266-20170108-v1.8.7.bin |
Now MicroPython is running on your device! We can connect to the Python REPL by opening up the com port with a baud rate of 115200. Windows users can use PuTTY or a similar tool to connect. Linux/Mac users can use screen to attach to the device using screen (make sure to use a baud rate of 115200):
|
1 |
screen /dev/ttyUSB0 115200 |
After attaching to the REPL try typing some python code like you normally would.
|
1 2 |
>>> print("Hello selfhostedhome.com") Hello selfhostedhome.com |
If you see the message print out everything should be installed correctly. You can also type in the following code to let MicroPython check the firmware image. If you get a True as the last line of your response then everything is working correctly.
|
1 2 3 4 5 |
>>> import esp >>> esp.check_fw() size: 604856 md5: 53b9852a38ac9f9e27694b3123fd1420 True |
Setting up WebREPL and WiFi
Next, we’re going to look at setting up the WebREPL. The WebREPL provides a web interface to type code into the Python REPL as well as upload/download files. We can use this to upload a new version of boot.py and main.py so that the device can execute code automatically instead of us having to type it out every time.
So to get started make sure you are attached to the interface and type the following.
|
1 |
>>> import webrepl_setup |
After typing it a prompt will start up asking if you want to enable or disable it running on boot. Type E to enable it on boot and then create a password. After setting the password allow the board to reboot.
Next, we’re going to connect to your local WiFi so you can connect to the WebREPL from any device on your network. Open up a serial connection to the ESP8266 again and type the following (put in the correct ESSID and password for your WiFi access point)
|
1 2 3 4 |
>>> import network >>> sta_if = network.WLAN(network.STA_IF) >>> sta_if.active(True) >>> sta_if.connect('<your ESSID>', '<your password>') |
Now the device should be connected to your WiFi. All the code is doing is importing the network module from MicroPython, getting an object for the WiFi station interface, enabling it and then connecting to the WiFi.
Use the following to make sure your device is connected and get the IP address:
|
1 2 3 4 |
>>> sta_if.isconnected() True >>> sta_if.ifconfig()[0] '192.168.1.175' |
Take note of the IP address, we’ll use it in the next section when using the WebREPL.
Using WebREPL
You should now have WebREPL setup and the device connected to your local access point with a local IP address assigned. Next open the WebREPL website and change the IP address to match the local IP address for your device. You could self host this application yourself, but for the time being we’ll use the hosted version for starting development.
Click the Connect button after changing the IP address and type the password you set in the last section. You should get a “WebREPL connected” message. You now have access to the same REPL that you did when accessing the device over the serial connection. This web interface also exposes some nice features to send and receive files.
Automatic Connect to WiFi on Boot
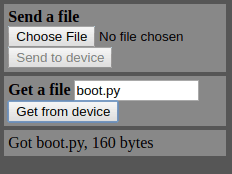
We’re now going to modify the boot code to automatically connect to our our access point on bootup. This is done by modifying the boot.py file that is in the flash memory on the device. Using the WebREPL download the current boot.py file sitting on the device. Check the screenshot below, click the Get from device button after filling out the form.
So the boot.py is now downloaded to your machine. Open it up in your favorite text editor, mine looks like:
|
1 2 3 4 5 6 7 |
# This file is executed on every boot (including wake-boot from deepsleep) #import esp #esp.osdebug(None) import gc import webrepl webrepl.start() gc.collect() |
Now, we’re going to modify this so that it runs the correct python code to connect to the access point. Edit the file to look like this, change the ESSID and password again to match your setup.
|
1 2 3 4 5 6 7 8 9 10 11 12 13 14 15 16 17 18 19 20 21 22 23 24 |
# This file is executed on every boot (including wake-boot from deepsleep) #import esp #esp.osdebug(None) import gc import webrepl import network webrepl.start() gc.collect() ESSID = "<your ESSID>" PASSWORD = "<your password>" def connect(): sta_if = network.WLAN(network.STA_IF) if not sta_if.isconnected(): print('connecting to network...') sta_if.active(True) sta_if.connect(ESSID, PASSWORD) while not sta_if.isconnected(): pass print('network config:', sta_if.ifconfig()) connect() |
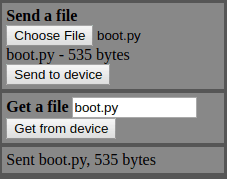
Upload the new boot.py using the WebREPL.
Once it’s uploaded you can unplug your board to power reset the device. This time after resetting the device should automatically connect to your WiFi network. To test this you can try to connect again using the WebREPL, which should work if the IP address remained the same. You can also use the serial REPL and run the following again:
|
1 2 3 4 5 6 |
>>> import network >>> sta_if = network.WLAN(network.STA_IF) >>> sta_if.isconnected() True >>> sta_if.ifconfig()[0] '192.168.1.175' |
Next Steps
You should now have a WiFi MicroPython device that automatically connects to your network when it boots up. In future articles I’ll be using this as a basis for communicating with a MQTT broker to push and pull data. Subscribe to the blog if you want to learn more!