
The NVIDIA Shield is a powerful media player device that provides the best Android TV experience in the market today. If you’re a Home Assistant user you might be asking how can I integrate the NVIDIA Shield with Home Assistant and what can it do?
In today’s article I walk through a quick tutorial on setting up the NVIDIA Shield with Home Assistant and working out any quirks. I also share how I trigger lighting scenes when we start a movie and how to launch YouTube videos using an automation.
Setting Up NVIDIA Shield with Home Assistant
To enable control of the NVIDIA Shield in Home Assistant, we’ll be using the Android TV integration.
Enable ADB Debugging
The first step you’ll need to do is to enable ADB debugging on your NVIDIA Shield. ADB stands for “Android Debug Bridge” and it will essentially allow Home Assistant to communicate with your NVIDIA Shield to get data about its current status. It will talk to the NVIDIA Shield over your network connection, so no need to have a USB cable or something like that between the Shield and Home Assistant.
For the NVIDIA Shield, you can enable ADB debugging by:
- Go to “Settings” -> “Device Preferences” -> “About” -> “Build”
- Press the select button on the remote with “Build” selected 7 times. This will enable developer options.
- Now go to “Settings” -> “Device Preferences” -> “Developer Options”
- Enable “Developer Options”
- Enable “Network Debugging”
Great! Now ADB Debugging should be enabled on your device and you’re ready to add the new entity to Home Assistant.
Adding to Home Assistant
Looking back at the Andorid TV integration docs in Home Assistant, essentially all you need is the IP address and a name for the media player.
|
1 2 3 4 5 6 |
--- media_player: - platform: androidtv name: Living Room NVIDIA Shield host: 192.168.1.34 |
After adding your Shield to your configuration, restart Home Assistant. Stay close to your TV though, because you’ll probably get a pop up like this one wanting you to confirm it’s okay for Home Assistant to connect.
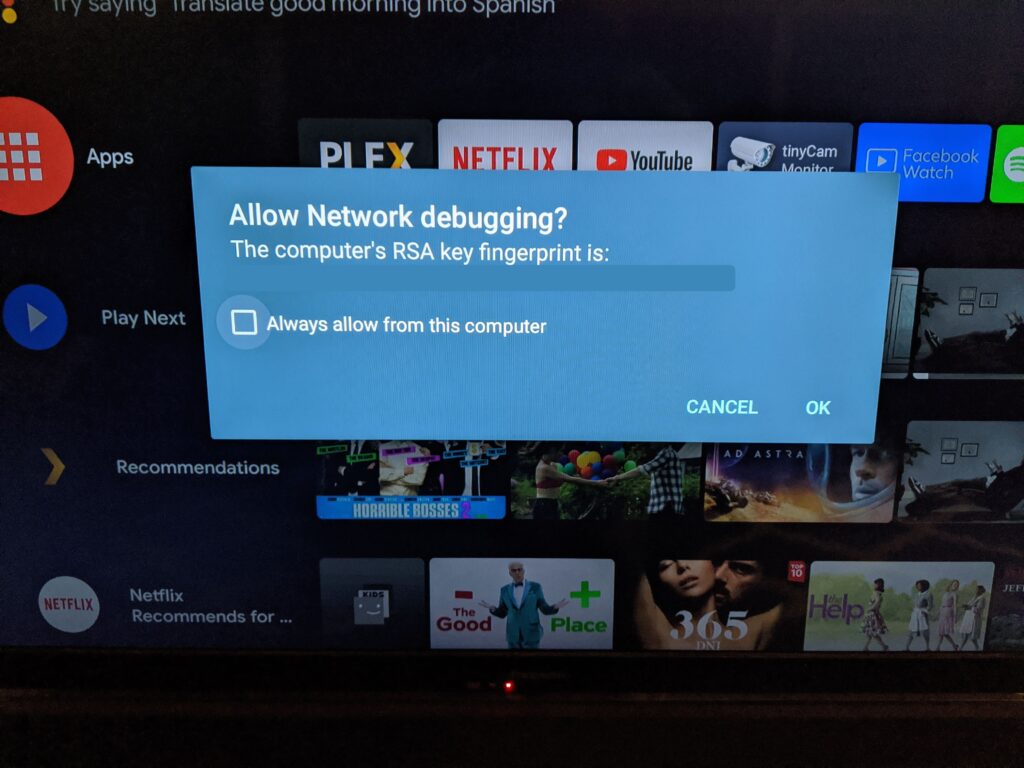
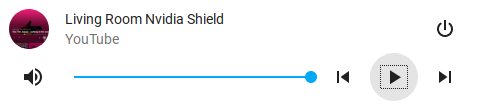
After confirming network debugging is okay, a new Home Assistant entity should exist with the name given in your configuration. You can add it to your Lovelace UI which allows you to see the current status, choose a media source, control audio level, start, play, pause, etc…
Customizing Media Sources
After playing around with your new integration, you might notice that certain apps don’t render their app name correctly in Home Assistant. You might see them listed as "com.company.mygreatapp" instead of a more readable app name. Home Assistant knows how to convert some of these names for popular apps, but if you need to get it to work with an unsupported app there are a couple of steps.
I was having this problem with TinyCam, a simple app that shows RTSP feeds for checking your security cameras on your Shield.
To get Home Assistant to recognize the app name, you can provide a mapping between the “com” name and the more readable name. You can see below I’m mapping "com.alexvas.dvr.pro" to “TinyCam Pro”.
|
1 2 3 4 5 6 7 8 9 |
--- media_player: - platform: androidtv name: Living Room Nvidia Shield host: 192.168.1.34 apps: com.alexvas.dvr.pro: TinyCam Pro |
After restarting, Home Assistant should now display the more readable name whenever the app is launched. You might notice though that Home Assistant isn’t correctly showing the “playing, paused, standby” status for this new app. This is also something we can fix!
Customizing Media Player Status
First launch whatever app you are customizing and start playing some media.
Then, go to the Home Assistant services tab and run the androidtv.adb_command service with the command GET_PROPERTIES.
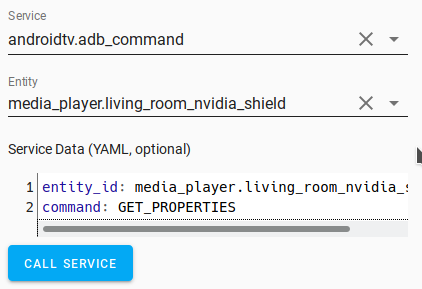
Switch to the entities developer tool and you will see a new attribute for your media player entity called adb_response. Within that response, you should make note of the “media_session_state“, “audio_state” and “wake_lock_size“. These things can mean different things to each app, so each specific app will set these to different values depending on if you’re playing, paused, etc…
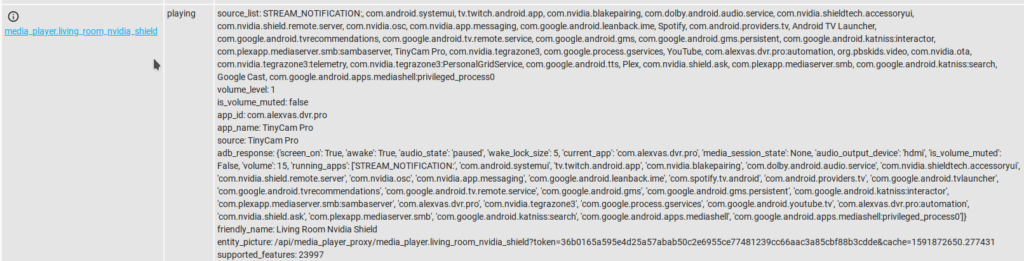
You can see in the screenshot below that “wake_lock_size” is set to 5 while I was playing video. I also found that the “wake_lock_size” is also 3 or 6 when playing video in TinyCam.
You can configure Home Assistant to know what state these values map to. In the below configuration I’m mapping the values 3, 5, 6 for wake_lock_size to be in the “playing” state. If none of those rules match, Home Assistant things the app is in “standby”.
|
1 2 3 4 5 6 7 8 9 10 11 12 13 14 15 16 17 |
--- media_player: - platform: androidtv name: Living Room Nvidia Shield host: 192.168.1.34 apps: com.alexvas.dvr.pro: TinyCam Pro state_detection_rules: 'com.alexvas.dvr.pro': - 'playing': 'wake_lock_size': 3 - 'playing': 'wake_lock_size': 5 - 'playing': 'wake_lock_size': 6 - 'standby' |
You can continue the process for every app that you have that Home Assistant doesn’t automatically recognize. That way, you can make automations that are based on the state of the media source.
Automations with NVIDIA Shield
Your NVIDIA Shield is now connected to Home Assistant and can now be controlled remotely through the Home Assistant UI, but what can we automate with it? Below are a few ideas for how to use Home Assistant services to improve your automated smart home.
Triggering Lights on Media Playback
If you have smart lighting in the same room as your media player, you can automatically dim lights once media playing starts. I like to use Home Assistant scenes to state how I want the lighting in a room to look.
|
1 2 3 4 5 6 7 8 9 10 |
--- name: TV Time entities: light.living_room: state: true transition: 10 brightness: 50 light.living_room_lamp: state: false |
After defining a scene, you can trigger it from a Home Assistant automation when media starts playing on your NVIDIA Shield. I want the scene to trigger anytime media starts playing after sunset, unless it’s the TinyCam Pro app, which we use sometimes just to view our security cameras.
|
1 2 3 4 5 6 7 8 9 10 11 12 13 14 15 16 17 18 19 20 21 22 23 24 |
--- alias: TV Time trigger: - platform: state entity_id: media_player.living_room_nvidia_shield to: 'playing' - platform: state entity_id: sun.sun to: 'below_horizon' from: 'above_horizon' condition: - condition: state entity_id: sun.sun state: 'below_horizon' - condition: state entity_id: media_player.living_room_nvidia_shield state: 'playing' - condition: template value_template: "{{ (state_attr('media_player.living_room_nvidia_shield', 'app_name')) != 'TinyCam Pro' }}" action: - service: scene.turn_on entity_id: scene.tv_time |
Triggering YouTube Video
Another thing you might want to do is automatically play a YouTube video whenever an event occurs. Maybe during the holidays, you want to come into a house with the classic log fireplace video running.
Well that can easily be achieved by using the adb_command service once again.
This time though we use the view intent action to launch the video. This tells Android TV to open the correct app with the link, which happens to be YouTube.
|
1 2 3 |
service: androidtv.adb_command entity_id: media_player.living_room_nvidia_shield command: "am start -a android.intent.action.VIEW https://www.youtube.com/watch?v=GG8LcqR1kqw" |
The Home Assistant media player integration has lots of other services. Let me know in the comments any automations you’re planning on using with the NVIDIA Shield.
Closing Thoughts
Hope you enjoyed my walk through of setting up the NVIDIA Shield with Home Assistant. Take some inspiration from my automation and the Home Assistant services I’ve shown to create an automated media player setup. I’m really happy with my NVIDIA Shield and it’s been rock solid since upgrading my media center.
If you found this product set up and review helpful, you might enjoy some of my other blog posts:
- Levoit LV-PUR131S WiFi Air Purifier Review
- GE Z-Wave Plus Outdoor Smart Plug Review
- WiFi RGB LED Strip Music Visualization
Please consider supporting the blog by joining my mailing list, following the blog on social media or directly through Buy Me a Coffee. All of those really make a difference, thanks for reading!