
We recently took the plunge into the robot vacuum world and ended up getting the Xiaomi Roborock S5. Today’s article goes through the basic setup of getting the robot vacuum working with Home Assistant including:
- Controlling the vacuum from the Home Assistant frontend
- Start cleaning a room from the Home Assistant frontend
- Start cleaning a room using the Google Assistant
There are a few steps that are Android specific, so if you’re an iOS user you’ll need access to an Android device to follow this guide.
If you’re on the fence about which robot vacuum to get check out this great Reddit thread. We ultimately went with the Roborock because of the great reviews of its vacuuming ability as well as the relatively cheap price compared to some of the other high-end robotic vacuums.
Getting Your Token
In order to add your vacuum to Home Assistant, you need to know the IP address of the vacuum as well as a token the Mi Home app uses to communicate with your vacuum. If you’re like me, immediately you opened your new vacuum once it showed up on your door and hooked it up to your phone. That’s all fine and dandy, but we actually need an older version of the Android Mi Home app to get the token for Home Assistant.
To get your token:
- Download and install version 5.4.54 of the Mi Home app
- Open the app, log into your account and start a clean using the app
- Let the clean run for a while
- Open up the “Files” app (or another file explorer) and open the “SmartHome/logs/Plug_Devicemanager” directory and look for the latest log file
- Search for “token” in the file. You should see something like this:
SmartHome 1117262:[DEBUG]-03-22 21:03:54.759 processResult in result={"code":0,"message":"ok","result":{"list":[{"did":"117786058",“token”:”1234567890aebcdef09876543210fedc”, …
Once you’ve got the token, I’d recommend setting a static IP address for your vacuum through your router. You can add the vacuum to Home Assistant by adding the vacuum platform to your configuration.
|
1 2 3 4 |
vacuum: - platform: xiaomi_miio host: 192.168.1.12 token: !secret xiaomi_miio_vacuum_token |
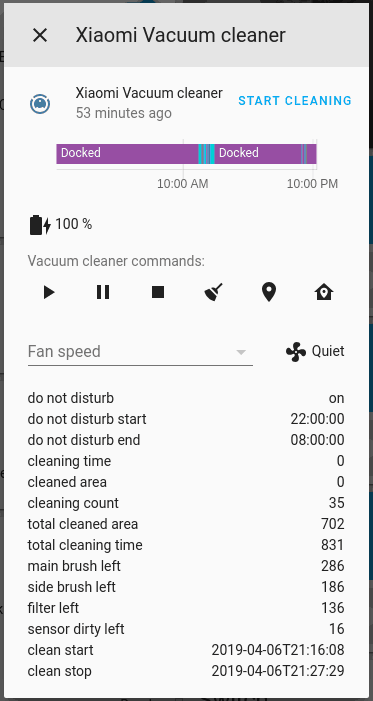
Reboot Home Assistant and you’ll see the vacuum in your frontend, you’ll be able to start, stop, pause, clean and change fan speed.
Now that you have the token, feel free to update the Mi Home app back to the latest version on the Google Play Store.
Zoned Cleanup Using Home Assistant
One of the great features of the Roborock S5 is the ability to clean specific zones. We will get coordinates for all the rooms and hallways in your house and set up Home Assistant to trigger cleaning them by sending a command to the robot vacuum.
Note: One very annoying habit of the Roborock is it likes to re-draw the map every once in a while. Particularly if you do the default “Clean” rather than “Zoned Clean”. So after you have your map complete, only use “Zoned Clean” going forward so that your map and coordinates stay consistent.
Make Your Map
First, make sure your robot has a complete map of your house. For this, I started a regular cleaning cycle while the robot was docked and let it draw a brand new map. Afterward, you should have a complete map of your house.

Next, we’re going to need another Android app to actually get the coordinates of the rooms. Download the FloleVac app from the Google Play store. Log into your Xiaomi account in the app and connect to your robot. Launch the app and do the following:
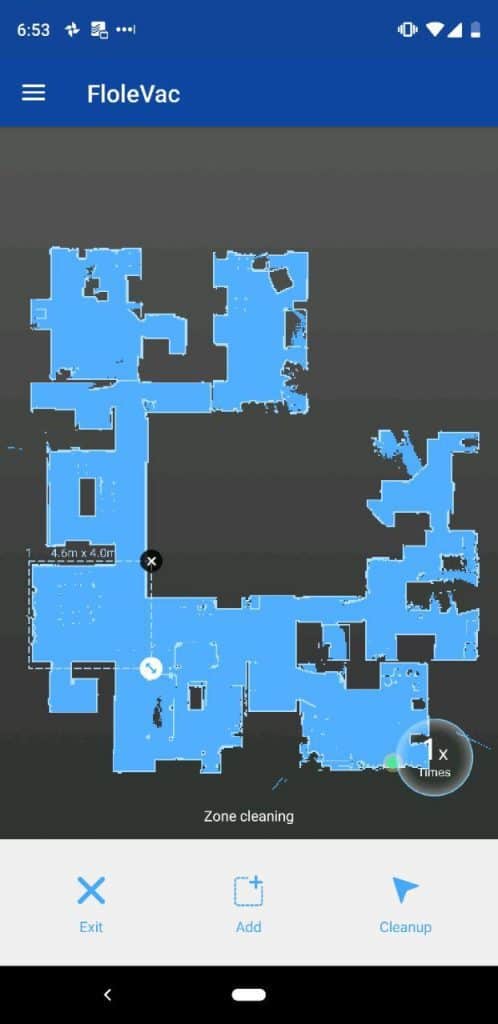
- Go to the “Map” section of the app and you should see the map that was created with by your vacuum
- Tap “Zoned Cleanup”
- Put the border around the room you want to clean
- Long press the “Cleanup” icon in the bottom right. Instead of actually starting a clean, it copies the coordinates onto your clipboard.
- Continue for all the rooms you want to enable
Below you can see me drawing the rectangle around my dining room before copying the coordinates.
Setting Up Zoned Cleaning with Scripts and Automation
Now that we have room coordinates recorded we can set up Home Assistant to clean per room. The below flowchart shows how the configuration is set up. There are essentially two entry points to the “dispatch” script (the green box) which chooses the correct room to clean.

First, we need to create a Home Assistant script per room (the blue boxes in the above diagram) to call the vacuum service to clean the coordinates for that room. Below is my example vacuum_kitchen script which calls the vacuum.send_command service with the coordinates to clean. If it’s easier for you to follow using a git repository, check out my Home Assistant configuration on GitHub.
|
1 2 3 4 5 6 7 8 9 10 |
--- vacuum_kitchen: alias: "Vacuum Kitchen" sequence: - service: vacuum.send_command data: entity_id: vacuum.xiaomi_vacuum_cleaner command: app_zoned_clean params: [[12435,32906,16785,37456,2]] |
Once you have all the scripts setup per room, we can create a “Vacuum Dispatch” script. This will take a parameter “room” and then call the appropriate room script to start vacuuming. You’ll need to adjust to all the rooms you have. You’ll notice the script compares the room variable to several different naming variations of the same room. This is so that someone using Google Assistant doesn’t have to match the script name exactly, several different phrases can map to the same room.
|
1 2 3 4 5 6 7 8 9 10 11 12 13 14 15 16 17 18 19 20 21 22 23 24 25 26 27 28 29 30 31 |
--- vacuum_dispatch: alias: "Vacuum Dispatch" sequence: - service: script.turn_on data_template: entity_id: >- {% if room|lower in ("office", "the office") %} script.vacuum_office {% elif room|lower in ("entryway", "the entryway") %} script.vacuum_entryway {% elif room|lower in ("living room", "the living room", "den", "the den") %} script.vacuum_living_room {% elif room|lower in ("dining room", "the dining room") %} script.vacuum_dining_room {% elif room|lower in ("guest room", "the guest room", "guest bedroom", "the guest bedroom") %} script.vacuum_guest_bedroom {% elif room|lower in ("nursery", "the nursery", "baby room", "the baby room") %} script.vacuum_nursery {% elif room|lower in ("master bedroom", "the master bedroom", "master", "the master") %} script.vacuum_master_bedroom {% elif room|lower in ("master bathroom", "the master bathroom", "master bath", "the master bath") %} script.vacuum_master_bathroom {% elif room|lower in ("laundry", "the laundry", "laundry room", "the laundry room") %} script.vacuum_laundry_room {% elif room|lower in ("kitchen", "the kitchen") %} script.vacuum_kitchen {% elif room|lower in ("hallways", "the hallways", "hallway", "the hallway", "walkways", "the walkways") %} script.vacuum_hallways {% endif %} |
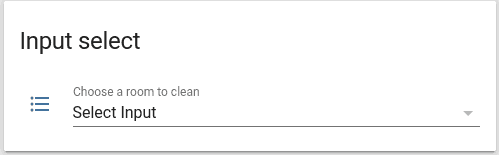
Next, we want to add an input select component to Home Assistant so we can choose a room from the front end UI.
|
1 2 3 4 5 6 7 8 9 10 11 12 13 14 15 16 17 18 |
--- vacuum_room: name: Choose a room to clean options: - Select Input - Office - Entryway - Living Room - Dining Room - Guest Room - Nursery - Master Bedroom - Master Bathroom - Laundry Room - Kitchen - Hallways initial: Select Input |
Which results in a drop-down menu on your frontend.
Finally, we need to create an automation to trigger the “dispatch” script whenever the drop-down menu changed. The following automation checks for a change to the input select and then calls the dispatch script with the chosen room.
|
1 2 3 4 5 6 7 8 9 10 11 12 13 14 15 |
--- alias: Start Cleaning Room trigger: - platform: state entity_id: input_select.vacuum_room from: 'Select Input' action: - service: script.vacuum_dispatch data_template: room: "{{ trigger.to_state.state }}" - service: input_select.select_option entity_id: input_select.vacuum_room data_template: option: "Select Input" |
Restart Home Assistant after adding all the YAML to your configuration. You should now be able to trigger zoned cleanup from the Home Assistant frontend. Check out my Home Assistant configuration to see how I organized the configuration files.
Using Google Assistant
Next, let’s hook our robot up to Google Assistant so that we can use any Google Home device or Android phones to start cleaning a room. To do so, you’ll need to be able to call a webhook, which means your Home Assistant instance must be accessible from the internet. By far, the easiest way to do this is using Nabu Casa. If you haven’t already, give the Nabu Casa 30 day trial a shot to see if it makes sense for you.
First off, go to your Home Assistant “Configuration” page and click on “Integrations” in Home Assistant and enable the IFTTT Webhook integration.
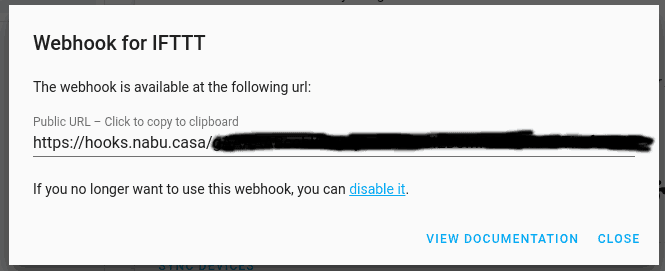
Next, go the “Configuration” page and click on “Home Assistant Cloud” and scroll down to the “Webhooks” section. Create the IFTTT Webhook and copy the Public URL.
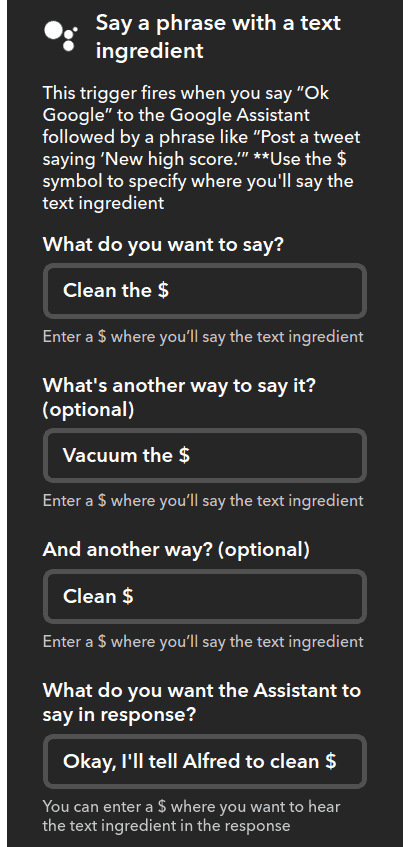
Next, go to IFTTT and create a new applet. For the “This” portion of the applet choose “Google Assistant” and “Say a phrase with a text ingredient”. The text ingredient in our case will be the room to clean.
Set your phrases and the response you want Google Assistant to say back to you.
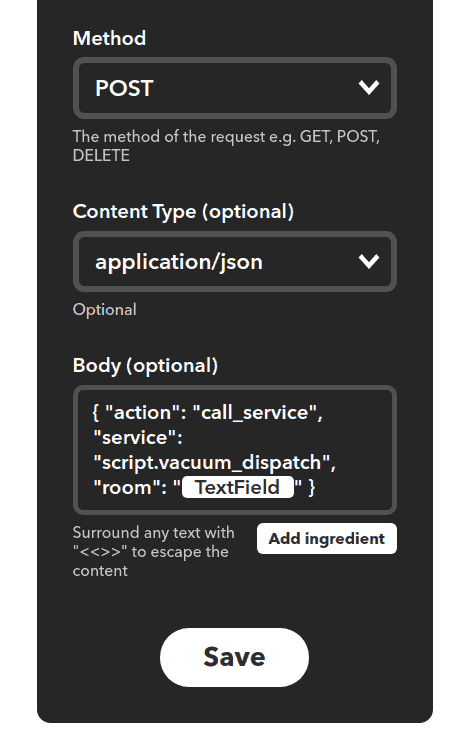
For the “That” section you’ll want to issue a webhook. For the URL use the URL you copied from the instructions above. You’ll want to use a POST method and application/json Content Type. In the body, we’ll essentially call the vacuum_dispath script with the room variable set to the TextField which was spoken to the assistant in the trigger.
Finally, we need to add an automation to Home Assistant to actually call the script. Add the following to your automation configurations.
|
1 2 3 4 5 6 7 8 9 10 11 12 13 14 15 |
--- alias: IFTTT Start Cleaning Room trigger: - platform: event event_type: ifttt_webhook_received event_data: action: call_service condition: condition: template value_template: "{{ trigger.event.data.service == 'script.vacuum_dispatch' }}" action: service_template: '{{ trigger.event.data.service }}' data_template: room: '{{ trigger.event.data.room }}' |
Here you can see the automation is triggered on the IFTTT webhook. We use a condition to ensure that the webook was meant for this automation. Finally, we call the vacuum_dispatch script with whatever room was spoken. This uses the same dispatch script that was called earlier through the user interface.
That’s it! Restart Home Assistant and try cleaning a room!
Next Steps
Thanks for reading my tutorial on setting up zoned cleaning with the Roborock S5 and zoned cleanup. If you’re still on the fence about the vacuum, I definitely recommend it. Getting the initial token can be a pain (especially if you’re an iOS user) but once you’ve figured that out, it integrates great with Home Assistant.
If you’re looking for more information on the Roborock with Home Assistant there is a great thread in the Home Assistant forums where people show off their automations, alternative firmware, custom user interfaces and other getting started tips.
Finally, make sure you subscribe to the mailing list and social media to hear the latest from Self Hosted Home! If you’re interested in other products I’ve included in my smart home check out the My Setup page.