

Want to add video surveillance to your home? After looking through several different camera hardware and software setups I decided to invest in the Ubiquiti Networks solution starting with their “Dome” camera and hosting the UniFi Video software on my own home server. Today’s article covers the install process for both the hardware and software.
If you’ve been following the blog recently you’ll know my wife and I are expecting a child and I’ve previously set up a few smart appliances in the nursery. When looking at video monitors for the baby there are a ton of $100+ video monitors that work over WiFi. After doing some research, I decided we should just invest in a traditional PoE camera installed in the nursery that would give better performance. Once the baby is old enough we can always move it to monitor somewhere else in our house or garage.
Supplies
After doing some research I landed on using the Ubiquiti Networks surveillance cameras. In particular, I chose the UVC-G3-DOME camera which can record in 1080p at 30 FPS with a wide angle lens. The camera can be mounted inside on a wall or ceiling or even outside under an eve. It also comes with a built-in microphone.
A full list of supplies I needed for the project:
| Item | Comments |
|---|---|
| UVC-G3-DOME | Video Camera I went with |
| Ethernet Cable | Ethernet cable to route from switch to camera |
| RJ45 Keystones | (Optional) If you decide to terminate the cable in a box near the camera. |
| Blank Plates | (Optional) If you decide to terminate the cable in a box near the camera. |
| Single Gang Box | (Optional) If you decide to terminate the cable in a box near the camera. |
Ubiquiti Networks has a datasheet available with stats about the lens and camera sensor if you want to learn more about the hardware details.
Hardware Installation
Starting off, you need to figure out where to place the camera. Once it’s installed you’ll be able to adjust it manually Left/Right and Up/Down to get it in its final position, but you won’t have a ton of flexibility. We decided to put ours in the back corner of the room. The UVC-G3-DOME has a wide angle field of view making it great for indoor room applications like this.
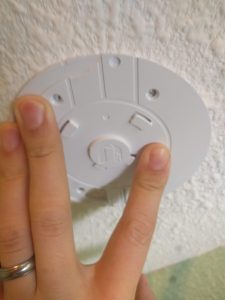
I started off by holding up the plastic mounting bracket to the ceiling and marking where the screws would be going.
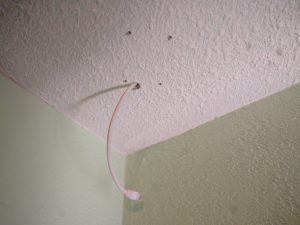
I then drilled holes for the screws and a larger 1/2″ hole for the ethernet cable to go through. Once done, I pushed the ethernet cable through the largest hole so I could find it while crawling around in the attic.
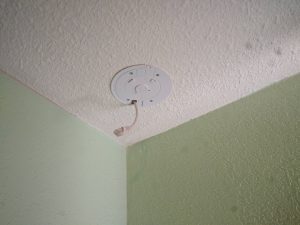
You’re going to need some help with this next part. Someone needs to screw the plastic mounting bracket into the metal bracket that goes on the other side of the ceiling. I crawled through my attic and found the ethernet cable, my wife then screwed the plastic bracket to the ceiling using screws while I attached the nuts on the attic side. This basically sandwiched the ceiling drywall between the two brackets. I had to move some insulation out of the way temporarily while attaching it.

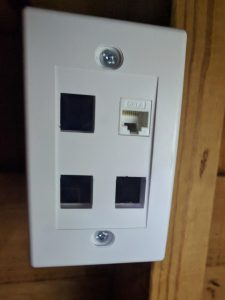
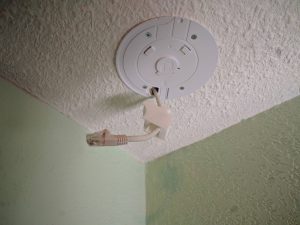
In the attic, I used a Single-Gang box with a CAT6 RJ45 keystone. I attached the ethernet cord that I pushed through the ceiling to the nex box as well as a new ethernet line from my switch in the wiring closet. Alternatively, you could run ethernet right from your switch to the camera and terminate it with an RJ45 connector using a crimper. Below is the picture of my new box in the attic sitting near the camera.
Finally, you can add power. If you have a POE enabled switch, you should be able to just plug in the ethernet cord right into the switch to provide power to the camera. The UVC-G3-DOME also comes with a POE injector, which I used to add power just for the ethernet port used by this camera.
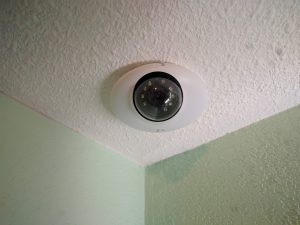
Route the ethernet cord through the cable gland and into the camera and the camera easily mounts to the installed bracket.
Overall the camera installation is pretty straightforward and depending on how easy it is to access your attic space, can be done in an hour or so. The mounting brackets and camera from Ubiquiti are high quality. Also the included POE injector is a great bonus for those of us without POE switches.
Software Setup
Camera
Now time for the software! If you bought a used camera I would recommend pushing something into reset slot for a few seconds to get it back to factory settings. Next, you’ll need to figure out the IP address of the camera. I typically just log into my router to figure out the new IP address.
Open up a web browser on your computer and navigate to the IP address. You’ll be greeted with a login screen. If you reset your device the default username and password should both be “ubnt”.
Click through the installation wizard and name your camera. If you don’t plan on using NVR software you should make sure to choose “Standalone” mode for your camera. You are able to watch the streams from your camera using RTSP but you won’t be able to automatically record video. If you do plan on using the NVR software, choose “UniFi Video” mode for your camera. I’ll walk through installing the NVR software in the next section.
After stepping through the installation, you should be able to see a preview of your camera. Go to the “System” tab and make note of the camera firmware version. Compare it against the version on the Ubiquiti Networks download page. If you’re out of date, download and update the firmware through the user interface.

Once done, the camera will restart and you should be able to access it again at the same address.
Network Video Recorder (NVR)
NVR Options
Now that our camera is set up and working, we can move on to the NVR. The NVR connects to all the cameras on your network and manages recording videos. It also provides a useful user interfaces to view multiple cameras at once. You have a couple of options for creating an NVR. First off, Ubiquiti actually sells an NVR with 2TB of storage available that runs a piece of software named UniFi Video. This is a great option if you don’t already have a home server or if you are looking for a dead-simple solution with as little maintenance as possible. If I was installing this at a friend or family members house, and this might be a good route.
The newest offering from Ubiquiti is the UniFi Cloud Key Gen2 Plus. This version allows you to manage Ubiquiti networking gear as well as video cameras and seems to be the future of what Ubiquiti is promoting. It runs the “Unifi Protect” software for managing your cameras. This might be a good option if you already have some existing Ubiquiti networking gear and want an appliance-like box that requires less maintenance.
Bring Your Own Hardware
Finally, there’s the “roll your own” solution, which I’ll be doing today. Basically, this allows you to run the same UniFi Video software found on their NVR on your own hardware. I’ve already got a home server running some other applications. So I decided to install the UniFi Video software alongside.
I went with a docker approach. There is a docker container already built by the community here. You can essentially run the container using the following command. Update the command with the locations of where to store your data and the video recordings. I found the container worked better when docker used the “host” network driver instead of the default “bridge” network driver. I just had fewer issues with the UniFi software communicating with my cameras. When using the “host” network driver you don’t need to declare any ports to forward because it attaches to your host’s network.
|
1 2 3 4 5 6 7 8 9 10 11 12 |
docker run \ --name unifi-video \ --cap-add SYS_ADMIN \ --cap-add DAC_READ_SEARCH \ --network host \ -v ${PWD}/data:/var/lib/unifi-video \ -v ${PWD}/videos:/var/lib/unifi-video/videos \ -e TZ=America/Chicago \ -e PUID=99 \ -e PGID=100 \ -e DEBUG=1 \ pducharme/unifi-video-controller:3.9.11 |
Once this process starts, navigate to http://<IP_ADDRESS>:7080/ to start the installation wizard. Enter in a name for your NVR and set up a username and password.
Connecting Your Camera
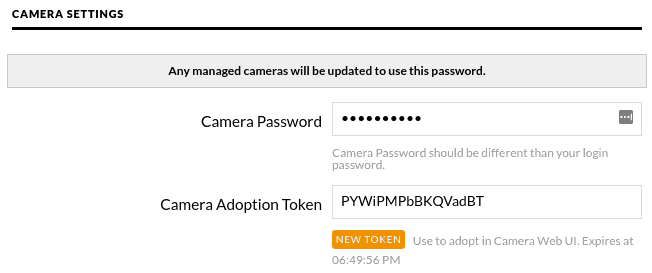
Your NVR instance may have automatically detected the IP camera on your network. If not, click on the “Settings” menu button in the bottom right and generate a Camera Adoption Token.
Next, navigate back to the IP address of the camera you just installed and enter in the IP address of your newly setup NVR and the camera adoption token.
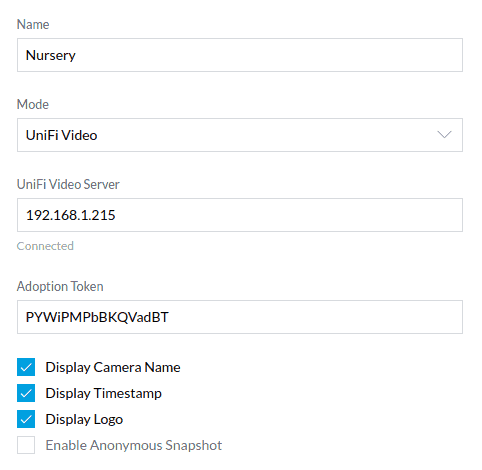
Save your settings and go back to your NVR. You should see the camera listed correctly now.

Now that your camera is considered to be “managed”, the password for the camera is now managed by the NVR. Go into the settings menu again if you want to see the camera’s password. You should now have a working NVR setup running on your own hardware that you control. Check out the “Live View” section of the NVR software to view multiple cameras at once. Stay tuned for a future article where I discuss more of the features of the NVR software.
Conclusion
Hope you enjoyed my setup tutorial for the UVC-G3-DOME camera and UniFi Video software. Overall the camera was pretty easy to install and getting the UniFi software in docker was straightforward. If you’re looking for a completely local self hosted video solution with great quality and robustness the UniFi Video platform could be right for you.
Subscribe to my email list or follow me on social media to hear more about future UniFi Video articles and related home surveillance topics!